Some of our favorite ways to use the fresh, seasonal produce we grow at Green Heart Garden, as well as recipes contributed from our members.

Spring produce brings a natural balance of flavors and textures that works beautifully in a grain bowl. Tender greens, crisp radishes, and sweet carrots create contrast in every bite, while brown rice provides a hearty base. This Spring Glory Bowl is our twist on the classic Glory Bowl by Whitewater Cooks, using ingredients that reflect what’s commonly found in CSA boxes this time of year.
Fava beans take the lead here, offering a buttery texture that pairs well with the assertive tahini and nutritional yeast dressing. Fresh parsley lifts the entire bowl with a clean, herbal note, and toasted pepitas add just enough crunch to keep things interesting. It’s a satisfying, flexible meal that can shift with the season while still delivering bold, comforting flavors.
Store components separately when possible to maintain the best texture. The rice, vegetables, and fava beans can be refrigerated in airtight containers for up to 4 days. The dressing will keep well in the refrigerator for up to 1 week; give it a good shake or stir before using.
For serving leftovers, reheat the rice gently and assemble bowls with fresh greens if available. The bowl can also be enjoyed cold or at room temperature, making it a solid option for packed lunches. Add the dressing just before serving to keep everything vibrant and well-balanced.

Crispy gnocchi has a way of turning a short list of ingredients into something that feels complete and satisfying. In this version, golden pan-fried gnocchi are paired with a mix of tender spring greens, then finished with creamy feta, fresh herbs, and a squeeze of lemon. Cannellini beans are added directly to the pan, creating a one-pot meal that brings in extra protein and a more substantial texture without adding extra steps.
This recipe was adapted from the New York Times Greek-inspired version, with a few thoughtful changes to better reflect what’s coming out of the field in spring. Instead of relying on spinach alone, a blend of tender greens adds both depth and a subtle peppery edge. The addition of cannellini beans shifts the dish from a light skillet into something more balanced and filling, while still keeping the process simple and weeknight-friendly.
The result is a dish that fits easily into a seasonal cooking rhythm. It highlights fresh greens, keeps prep straightforward, and delivers a mix of crispy, creamy, and bright elements that hold up from the first bite to the last.
Allow leftovers to cool completely before transferring to two airtight containers, one for the gnocchi and bean mixture and the other for the greens. Store in the refrigerator for up to 3 days.
To reheat, warm the gnocchi and beans in a skillet over medium heat with a small amount of olive oil. This helps bring back some of the crisp texture. Stir gently until heated through. A quick squeeze of lemon or a drizzle of olive oil right before serving helps refresh the flavors.

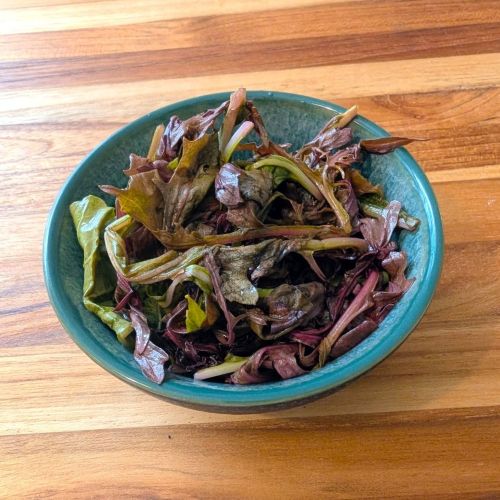
Collard greens transform beautifully through fermentation, developing a pleasantly tangy bite while retaining their hearty texture. This Ethiopian-inspired collard ferment layers garlic, jalapeno, ginger, and onion with warm spices for a bold, savory flavor that works as both a side dish and a punchy condiment. The result is vibrant, slightly spicy, and deeply satisfying, with just enough acidity to brighten everything it touches.
We adapted this recipe from the book Fermented Vegetables (a great book if you love fermenting), leaning even further into the spices commonly used in Ethiopian cooking. By emphasizing cardamom, cumin, and smoked paprika, the flavor profile moves closer to the warming complexity found in dishes like gomen wat. These additions give the ferment extra depth while still keeping the process simple and approachable, making it an easy way to preserve collards with a global twist.
If you're new to fermenting, it’s worth taking a few minutes to understand the basic tools, techniques, and safety tips involved. Head over to this post for a practical primer. It covers everything from choosing jars to what to expect during the bubbling phase, so you can start with confidence.
Store in an airtight container in the refrigerator for up to 4–6 weeks. Always use clean utensils to remove portions to avoid introducing bacteria.

Green garlic brings a mild, fresh allium flavor that sits somewhere between scallions and young garlic, making it perfect for quick cooking. In this noodle dish, it softens just enough in the skillet to mellow its bite while still adding a bright, seasonal note. Paired with a creamy sesame and peanut dressing, it creates a balanced combination of savory, nutty, and lightly tangy flavors.
This recipe is built for speed without sacrificing substance. The noodles cook alongside edamame for efficiency, while shredded carrots add crunch and color. The dressing comes together in minutes and coats everything in a glossy, flavorful layer. It works equally well as a quick dinner, a meal prep option, or a flexible base for adding extra vegetables or protein.
The result is a comforting bowl that feels substantial but not heavy. The combination of textures, from tender noodles to crisp carrots and toasted sesame seeds, keeps each bite interesting while remaining easy enough for a busy evening.
Store leftovers in an airtight container in the refrigerator for up to three days. The noodles will absorb some of the dressing as they sit, which deepens the flavor but can make them slightly thicker.
To serve, reheat gently in a skillet over medium low heat with a splash of water, soy sauce, or rice vinegar to loosen the sauce. Stir frequently until warmed through. The noodles can also be enjoyed cold or at room temperature, making them a convenient option for packed lunches.
For the noodles
For the sesame dressing
Spring brings a short window when mustard greens are at their most delicate. Young leaves have a gentle peppery bite and soft texture that makes them especially well suited for quick pickling. A simple brine tames their sharpness while keeping their color vibrant and their texture pleasantly tender.
Sliced garlic and fresh ginger add layers of flavor that feel fresh and lively without overwhelming the greens. The result is a versatile condiment that comes together in minutes and improves as it rests in the refrigerator. It is an easy way to extend the life of seasonal greens while adding a punchy, savory accent to everyday meals.
Store the pickles in their brine in a sealed jar in the refrigerator. They are best within 7 to 10 days, when the greens still retain their texture and fresh flavor. Keep the greens submerged in the liquid to prevent discoloration.
Serve straight from the refrigerator for the most refreshing flavor, or let them sit at room temperature for 5 to 10 minutes if pairing with warm dishes. Use clean utensils when removing portions to maintain freshness. If the brine level drops, gently press the greens down to keep them covered.
Optional:

Fresh spinach, creamy ricotta, and bright lemon zest come together in malfatti, traditional Northern Italian dumplings whose name translates to “poorly made,” though they’re anything but. These soft, pillowy dumplings are shaped by hand and cooked gently until tender, then served with a tomato sauce that complements their mild, savory flavor. Adding sliced green garlic while sautéing the spinach introduces a subtle aromatic note that lifts the dish without overpowering it.
Malfatti have a delicate texture that’s definitely indulgent, but also surprisingly easy to prepare. The dumplings are versatile enough to pair with a variety of sauces, from a classic tomato base to a light butter and sage drizzle. The combination of spinach, ricotta, and lemon zest keeps the flavors fresh and balanced, while the Parmesan adds a nutty richness. This recipe yields enough dumplings for four generous servings, making it an ideal choice for a family meal or a dinner with friends.
For the malfatti:
For serving:

This Southern Collards and Potato Stew brings together pantry staples and fresh vegetables in a way that satisfies while also being budget-friendly. Collard greens soften into the broth while potatoes add body, and black eyed peas contribute a subtle earthiness that ties everything together. The Cajun-influenced seasoning adds warmth and depth without overwhelming the vegetables.
The stew is designed to be flexible. It works beautifully as a vegan main dish, but optional additions like smoked sausage, turkey, or ham hock introduce a savory richness for those who want it. The result is a balanced, one-pot meal that adapts easily to different preferences and seasonal ingredients.
It also holds up well for meal prep. The flavors deepen after a day in the refrigerator, making it a strong option for make-ahead lunches or simple weeknight dinners.
Allow the stew to cool to room temperature before transferring to airtight containers. Store in the refrigerator for up to 4 days. The flavors continue to develop, and the stew often tastes even better the next day.
Reheat gently on the stovetop over medium-low heat, stirring occasionally. Add a splash of broth or water if the stew has thickened. Individual portions can also be reheated in the microwave in 1 minute intervals, stirring between each interval until heated through. Garnish with fresh sliced green onions before serving to refresh the flavors.
Let the stew cool completely before portioning into freezer-safe containers. Leave about ½ inch of headspace to allow for expansion. Freeze for up to 3 months.
To reheat, thaw overnight in the refrigerator for best texture. Warm on the stovetop over medium-low heat, stirring occasionally and adding a small amount of broth if needed. The stew can also be reheated directly from frozen over low heat, though this will take longer. Stir occasionally to ensure even heating.
Optional meat additions, choose one

Brassica rabe brings bold flavor to the table, with a pleasant bitterness that pairs especially well with creamy and spicy elements. This dish softens those edges by layering the greens over whipped ricotta, then finishing everything with chili oil and toasted pine nuts. The contrast of textures and flavors makes it feel thoughtfully composed without adding extra work.
The preparation is straightforward. The ricotta is whisked until light and spread onto a serving plate, while the rabe is quickly sautéed with green garlic and red pepper flakes. A drizzle of chili oil adds warmth, and toasted pine nuts contribute a subtle nuttiness and crunch. The result is a side dish that feels substantial, yet still light enough to pair with a wide range of meals.
Store leftover brassica rabe and whipped ricotta in separate airtight containers in the refrigerator for up to 2 days. Keeping them separate helps maintain the creamy texture of the ricotta and prevents it from becoming watery.
To serve leftovers, gently reheat the brassica rabe in a skillet over medium-low heat until warmed through. Spread fresh or room-temperature ricotta onto a plate and spoon the reheated greens over the top. Finish with an additional drizzle of chili oil and a sprinkle of pine nuts if available.
For the Whipped Ricotta
For the Brassica Rabe
For Finishing

Slow cooker congee is one of the easiest ways to create a warm, nourishing meal with minimal effort. Rice gently breaks down over several hours, creating a silky texture while ginger and green garlic infuse the broth with subtle aromatic flavor. The result is a versatile bowl that feels both comforting and fresh.
Sauteed brassica rabe adds structure and a pleasant bitterness that balances the mild porridge. Optional toppings such as chili crisp, sliced radishes, or a soft-boiled egg allow each serving to be adjusted to individual preferences.
This recipe also works well for meal prep. A single batch produces enough for multiple servings, and the congee reheats beautifully. With just a few finishing touches, leftovers can feel just as satisfying as the first bowl.
Naked congee is a sad affair! It’s truly a blank slate waiting to be dressed up with toppings that add a variety of flavors & textures. Here’s a few more to consider:
Allow the congee to cool completely before transferring to an airtight container. Refrigerate for up to 4 days. The congee will thicken significantly as it chills, which is normal.
To reheat, place the desired portion in a saucepan and add water a few tablespoons at a time. Warm over medium low heat, stirring frequently, until the congee returns to a smooth, creamy consistency. Adjust seasoning with additional soy sauce and pepper if needed. Prepare fresh toppings just before serving for the best texture.
Congee freezes well for longer storage. Portion cooled congee into freezer safe containers, leaving a little headspace for expansion. Freeze for up to 2 months.
To reheat, thaw overnight in the refrigerator. Transfer to a saucepan and add water to loosen the texture. Warm gently over medium low heat, stirring frequently until heated through and creamy. Add fresh toppings after reheating rather than freezing them with the congee.
For the congee
Sauteed Brassica Rabe
Optional toppings

Turkish zucchini stew, known as kabak yemeği, is a humble yet flavorful dish that makes the most of fresh, seasonal vegetables. Tender zucchini and rice simmer gently in a tomato base, with the optional addition of biber salçası (Turkish red pepper paste) for a deeper, richer taste. Just before serving, it’s topped with tangy Greek yogurt, juicy diced plum tomatoes, fresh parsley, and mint, creating a dish that’s both satisfying and refreshing.
This stew is an excellent way to highlight zucchini in a main or side dish that feels nourishing without being too heavy. It’s versatile enough for a simple weeknight dinner yet vibrant enough to share at a gathering. Paired with a crusty bread to soak up the extra sauce, it brings the kind of comfort that’s rooted in tradition while still leaving room for creativity in the kitchen.
To Serve

Fermentation transforms cherry tomatoes into something completely different from their fresh form—briny, tangy, and slightly effervescent with a depth of flavor that salt alone can’t achieve. They become more than just a garnish; they turn into a condiment, snack, or secret ingredient that elevates everyday dishes.
This recipe layers garlic, bay leaf, black peppercorns, and coriander seed into the brine, creating a balanced, savory base that complements the natural sweetness of the tomatoes. The result is bold but versatile, the kind of flavor that pairs just as well with a grain bowl as it does on a cheese board.
The process is simple and requires no special equipment beyond a jar, salt, and water. Within a week, you’ll have tomatoes that feel alive with flavor and can be enjoyed straight from the jar or woven into recipes where a punch of acidity and freshness is needed.
If you're new to fermenting, it’s worth taking a few minutes to understand the basic tools, techniques, and safety tips involved. Head over to this post for a practical primer. It covers everything from choosing jars to what to expect during the bubbling phase, so you can start with confidence.
Once fermented to your liking, keep the jar tightly sealed in the refrigerator. The tomatoes will maintain their flavor and texture for 2–3 months. Always make sure the tomatoes remain submerged in the brine to prevent spoilage.
Serve chilled straight from the jar, or bring them to room temperature for use in salads and boards. The leftover brine is a bonus—use it as a tangy base for salad dressings, marinades, or even as a savory cocktail addition.

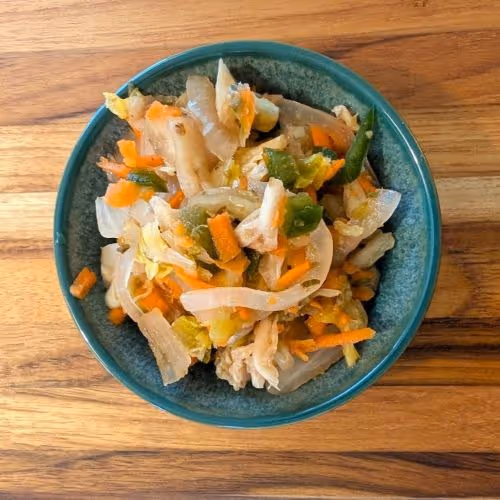
Tikil Gomen is one of those dishes that proves how humble ingredients can shine when treated with care. Cabbage, carrots, and potatoes are slowly simmered with onion, garlic, ginger, and fragrant spices until tender and flavorful. It results in a side dish that’s hearty yet light, warmly spiced without being overpowering.
This dish is often part of a traditional Ethiopian spread, served alongside injera and other vegetable preparations. The vegetables take on a gentle sweetness as they cook, balanced by turmeric and cumin, with lemon juice at the end brightening everything up. It’s the kind of side that brings color and comfort to the table.
Easy to prepare with pantry-friendly ingredients, Tikil Gomen fits seamlessly into weeknight dinners yet feels special enough for a larger meal. Whether you’re pairing it with lentils, greens, or flatbread, it’s a versatile addition worth making again and again.
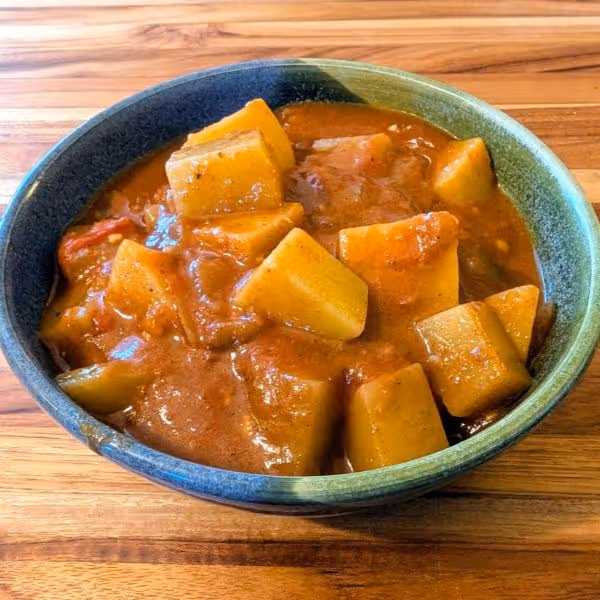
Dinich Wot, or Ethiopian spicy potato stew, is a comforting side dish that highlights how a few carefully chosen ingredients can create deep, memorable flavors. The foundation comes from berbere, Ethiopia’s signature spice blend, which infuses the potatoes with rich warmth and medium heat. The addition of garlic, ginger, cumin, and cardamom creates a fragrant, savory base that turns simple potatoes into something special.
This dish is traditionally served as part of an Ethiopian meal alongside injera, where its bold, spicy character complements the tangy flatbread beautifully. Even outside of its cultural roots, it makes a wonderful addition to any dinner table, offering an easy way to introduce new flavors without a long ingredient list or complicated steps.
For anyone wanting a side dish that balances comfort with vibrancy, Dinich Wot is a perfect choice. It’s equally suitable for weeknight dinners as it is for more elaborate meals with family or friends.
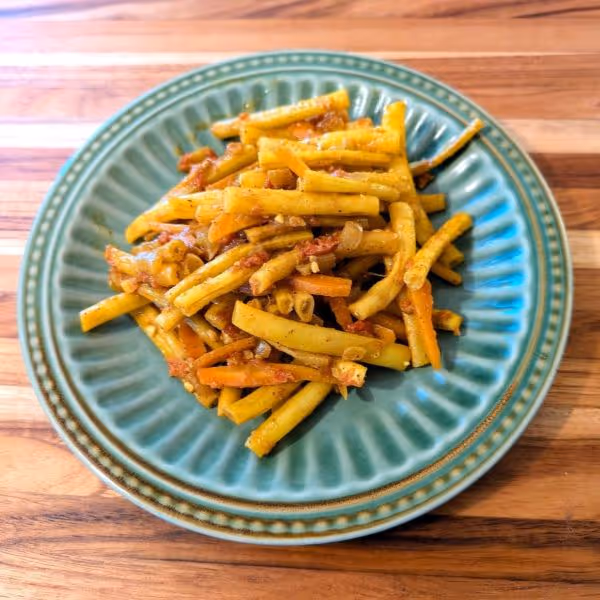
Fossolia is a classic Ethiopian vegetable side dish that transforms everyday string beans and carrots into something bold and memorable. The vegetables are gently simmered with onion, garlic, ginger, tomato, and warm spices, creating a dish that’s both comforting and vibrant.
At its heart, this dish highlights how simple vegetables can be elevated with the right combination of spices and aromatics.The beans and carrots retain their bright color and tender-crisp texture, while the turmeric, cumin, and cardamom infuse them with earthy depth. A squeeze of lemon at the end brings everything together with a refreshing finish.
Fossolia fits effortlessly into many meals, whether served as part of an Ethiopian spread with injera and lentils or alongside simple staples like rice and grilled meats. It brings both color and character to the table, making even an ordinary dinner feel special.
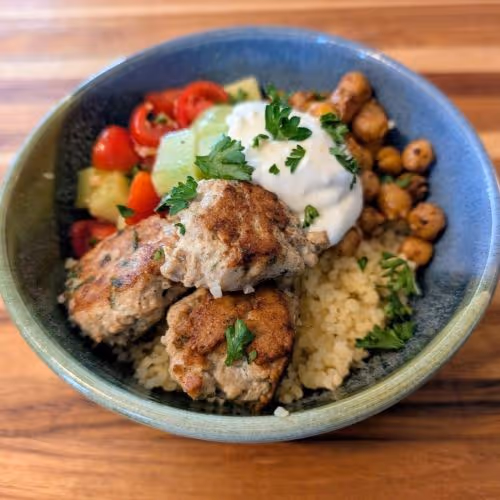
This recipe highlights Middle Eastern-inspired flavors in a satisfying, versatile bowl. Chicken kofta meatballs seasoned with warm spices form the savory heart of the dish, while chickpeas get quickly sautéed with garlic, cumin, sumac, and Aleppo pepper for smoky, tangy heat. To balance those deep flavors, a simple tomato and cucumber salad dressed with olive oil, lemon juice, and garlic adds freshness and crunch.
Served over cooked bulgur or couscous, the bowls come together with creamy garlic yogurt sauce, crumbled feta, and a sprinkling of fresh herbs. The result is a dish that feels both light and filling, with a mix of textures and flavors that make every bite crave-worthy.
Don't let the long ingredients list scare you. Most of the items are pantry staple flavor builders. This recipe is fairly simple to put together and great for meal prep lunches.
Store each component separately in airtight containers in the refrigerator for up to 4 days. Reheat the kofta and chickpeas in a skillet or microwave until warmed through. Keep the tomato-cucumber salad and yogurt sauce chilled, adding them just before serving.
For meal prep, assemble bowls ahead but leave off the salad, feta, and yogurt until serving. This keeps everything fresh and prevents soggy grains.
For the Chicken Kofta Balls
For the Garlic Yogurt Sauce:
For the Spiced Chickpeas:
For the Fresh Salad:
For Serving:

Pozole verde is a dish that feels both restorative and celebratory, filled with tender chicken, plump hominy, and a vibrant green broth that balances tangy tomatillos with nutty pepitas. It’s a lighter take on the more well-known pozole rojo, but it still carries the depth and warmth that makes pozole such a beloved comfort food.
The roasted tomatillos and peppers give the broth a smoky edge, while the pepitas add body and a subtle richness that sets this recipe apart from many others. Topped with crunchy cabbage, radishes, cilantro, and a squeeze of lime, every spoonful is layered with flavor and texture.
It’s a satisfying meal that doesn’t take all day to prepare, making it a wonderful option for weeknight cooking or weekend gatherings. The garnishes invite everyone at the table to customize their bowl, turning a simple pot of stew into a shared experience.
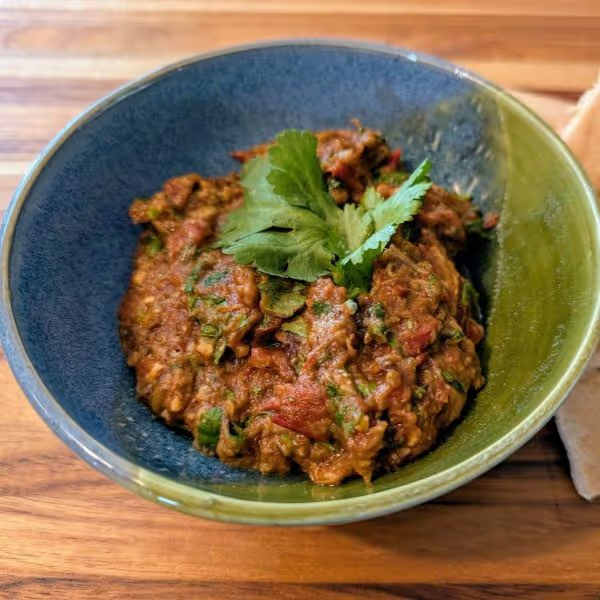
Zaalouk is a Moroccan staple made from eggplant, tomatoes, and fragrant spices, simmered together until rich and spreadable. The eggplant is traditionally sautéed, but roasting it deepens the flavor and adds a subtle smokiness that takes the dish to another level. With cumin, paprika, and fresh herbs folded in, the result is savory, tangy, and utterly satisfying.
This dip can be enjoyed warm, at room temperature, or chilled, making it one of those dishes that fits anywhere on the table. Serve it as part of a mezze spread, scoop it up with flatbread, or use it as a side to brighten up heavier main courses. It’s simple, wholesome, and full of character—just the kind of recipe to keep in your back pocket for easy entertaining or weeknight meals.
Another advantage of zaalouk is its flexibility. Fresh tomatoes in season add a bright, juicy flavor, while good-quality canned crushed tomatoes make it a pantry-friendly option year-round. You can also adjust the tomato to eggplant proportions to suit your taste. However you prepare it, this dish always delivers comfort with a Moroccan twist.
Zaalouk keeps well in the fridge and often tastes even better after a day as the flavors meld together. Store in an airtight container for up to 4 days. Serve leftovers cold straight from the fridge, or reheat gently on the stove over low heat with a splash of olive oil or water to loosen the texture.
To freeze, let the zaalouk cool completely, then transfer to freezer-safe containers in portion sizes that make sense for how you’ll use it. Freeze for up to 3 months. Thaw overnight in the refrigerator, then reheat gently in a skillet over low heat, stirring in a little olive oil or lemon juice to refresh the flavor.
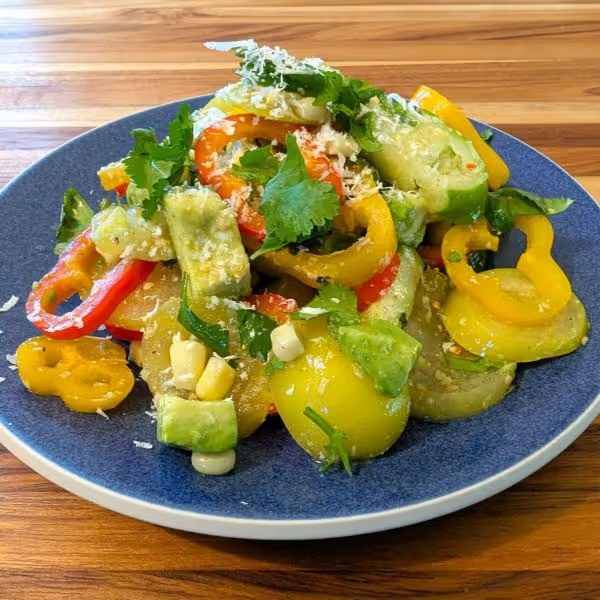
Tomatillos don’t always get the spotlight they deserve outside of salsa verde, but this salad makes them the star. Thinly sliced and left raw, tomatillos lend a tart, citrusy crunch that wakes up the entire dish. Paired with juicy sweet peppers, buttery avocado, and tender corn, it’s a vibrant mix of textures and flavors—each bite just a little different from the last.
A punchy lime vinaigrette ties it all together, bringing in brightness with a touch of honey and spice from cumin. Cotija cheese adds a salty richness, while toasted pepitas give the salad a nutty finish. It’s the kind of dish that doesn’t try too hard but still steals the show on the plate, especially at barbecues, picnics, or as a fresh side for anything smoky or grilled.
Tomatillo salad is best enjoyed the day it's made, but leftovers will hold up well for about 1–2 days in the refrigerator. Store the salad in an airtight container and avoid stirring in the avocado until just before serving to prevent browning. If the salad has already been dressed, give it a quick toss and a squeeze of fresh lime juice to refresh the flavors before serving again.
For the salad:
For the lime vinaigrette:
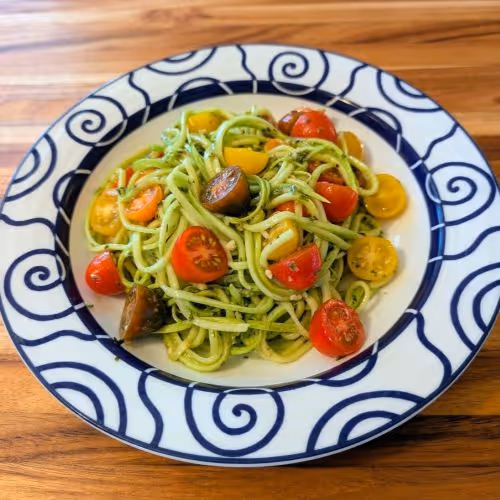
Zoodles, or zucchini noodles, are a game-changer for anyone looking to enjoy a lighter, veggie-packed alternative to traditional pasta. This dish combines the delicate crunch of fresh zucchini with the bold, herby flavor of chive pesto, all balanced by the sweetness of cherry tomatoes. It's a recipe that’s as delightful to eat as it is easy to prepare, making it an excellent choice for busy weeknights or a leisurely weekend lunch.
With just a few fresh ingredients and minimal cooking time, this zoodle dish promises a burst of summer in every bite. The chive pesto, with its garlicky, grassy notes, pairs perfectly with the tender zoodles and the pop of cherry tomatoes. Whether you're a seasoned home cook or just starting your culinary journey, this recipe is a fantastic way to celebrate the bounty of summer produce.
One of the beauties of this recipe is its versatility. Here are some ideas to tailor it to your taste or what you have on hand:
If you find yourself with leftovers (though it’s hard to imagine with a dish this tasty!), here’s how to keep them fresh and delicious:
For the Chive Pesto
For the Zoodles
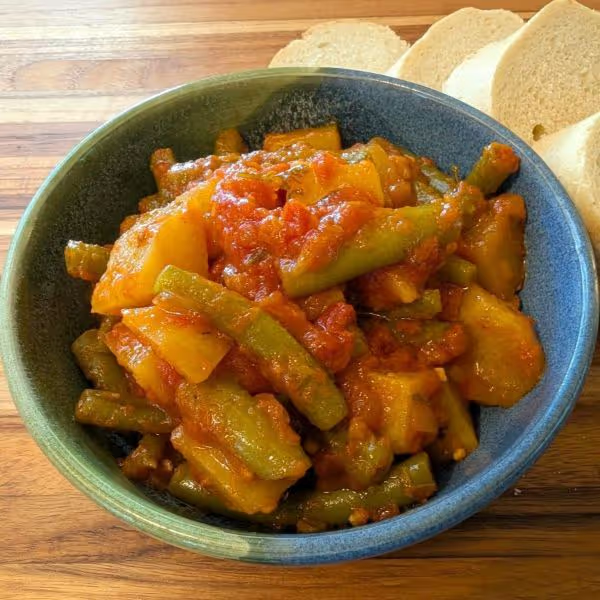
Green beans and potatoes may sound humble, but when simmered slowly in olive oil, garlic, and ripe tomato, they become something extraordinary. Fasolakia lathera is a staple of home cooking in Greece, especially during the summer when green beans are fresh and plentiful. The dish is hearty enough to serve as a main course, yet light enough to enjoy even on warm days.
The flavor comes from simplicity: potatoes soak up the tomato-rich sauce, the green beans grow tender and silky, and everything is bathed in good olive oil. This is a dish that rewards patience, with the long simmer giving the vegetables time to release their full sweetness. A generous handful of chopped parsley at the end adds freshness and balance. Serve it warm or at room temperature with lemon wedges and crusty bread to mop up the sauce.
Let the dish cool completely before transferring to an airtight container. Store in the refrigerator for up to 4 days. Reheat gently on the stovetop over low heat or in the microwave, adding a splash of water or olive oil if the sauce has thickened too much. Fasolakia lathera tastes even better the next day as the flavors continue to deepen. This dish is not recommended for freezing, as the texture of the beans and potatoes may suffer.

Fresh fava beans have a fleeting season, but fermentation lets you enjoy their flavor long after they disappear from your CSA Box. In this small-batch ferment, the beans are packed with sliced garlic, fragrant dill, and a strip of lemon peel that brightens every bite. The result is tangy, savory, and slightly creamy—perfect for snacking, topping, or adding to all kinds of savory dishes.
Lacto-fermentation works especially well with green fava beans because their firm texture holds up well to the brine, and their starchy insides develop a mellow, complex flavor as they ferment. Paired with herbs and citrus, this simple combination transforms into something punchy and memorable in less than a week.
This pint-sized ferment is easy to scale and customize depending on what you have on hand. It's a great way to preserve a haul of fresh favas and turn them into a versatile condiment or side.
If you're new to fermenting, it’s worth taking a few minutes to understand the basic tools, techniques, and safety tips involved. Head over to this post for a practical primer. It covers everything from choosing jars to what to expect during the bubbling phase, so you can start with confidence.
Once fermented to your preferred level of tang, remove any weight and seal the jar with a lid. Store the beans in the refrigerator, where they’ll continue to slowly develop flavor over time. They’ll keep well for up to 6 months when fully submerged in brine. Use clean utensils to remove beans from the jar to avoid introducing contaminants.
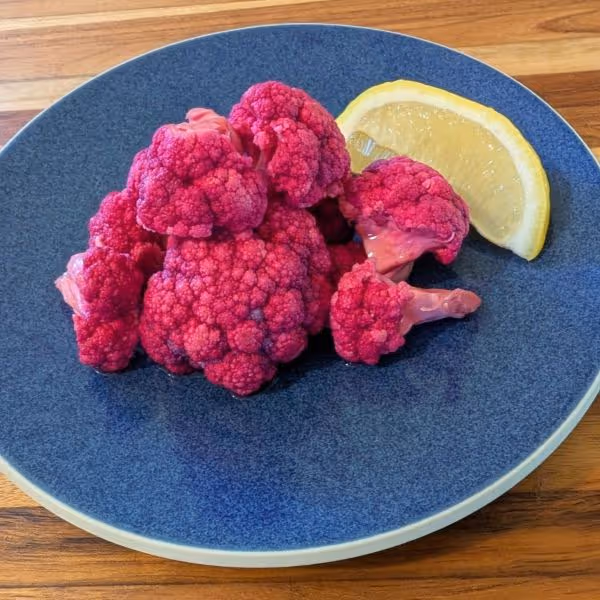
This recipe takes everything satisfying about classic pickled vegetables and gives it a citrus-forward twist. Fresh cauliflower florets are packed with thin slices of lemon, a few slivers of garlic, and aromatic spices before being bathed in a warm apple cider vinegar brine. The result is sharp, lemony, and crisp—with just enough garlic to keep things interesting.
Pickled cauliflower is a great make-ahead item for anyone who enjoys bold flavors with minimal effort. It works just as well as a crunchy snack from the jar as it does tucked beside sandwiches, stirred into grain bowls, or served as part of an appetizer spread. No canning required—just refrigerate and enjoy whenever the craving strikes.
These pickles are meant to be enjoyed cold, straight from the fridge. Store them in a tightly sealed glass jar for up to 3 weeks. Always use clean utensils to remove cauliflower from the jar to extend shelf life. This recipe is not intended for water-bath canning or shelf-stable storage.

Irish soda bread is already a comfort food staple, but this version adds a flavorful twist: sharp cheddar cheese and chopped garlic scapes. The tangy buttermilk dough comes together in minutes and bakes into a golden-crusted loaf with a tender crumb and pockets of melted cheese throughout.
The garlic scapes don’t overpower; they add a subtle green garlic flavor that works beautifully with the cheese and rustic bread. No need to fuss with yeast or waiting around for dough to rise—just mix, shape, bake, and enjoy warm from the oven. Whether you’re cooking for guests or slicing it up to snack on throughout the week, this savory soda bread is worth keeping in your rotation.
It’s equally at home beside a hearty bowl of soup as it is served with eggs for breakfast. The leftovers toast well and freeze even better, making it both satisfying and practical.
Wrap the cooled loaf tightly in foil or a reusable storage bag and keep at room temperature for up to 2 days. For longer storage, refrigerate it for up to 5 days.
To reheat:
To freeze, let the bread cool completely. Slice it (for easier reheating later), then wrap slices in parchment or wax paper and seal in a freezer-safe bag or container. Freeze for up to 2 months.
To reheat frozen slices:
Avoid microwaving unless wrapped in a damp paper towel—otherwise, the texture may toughen.
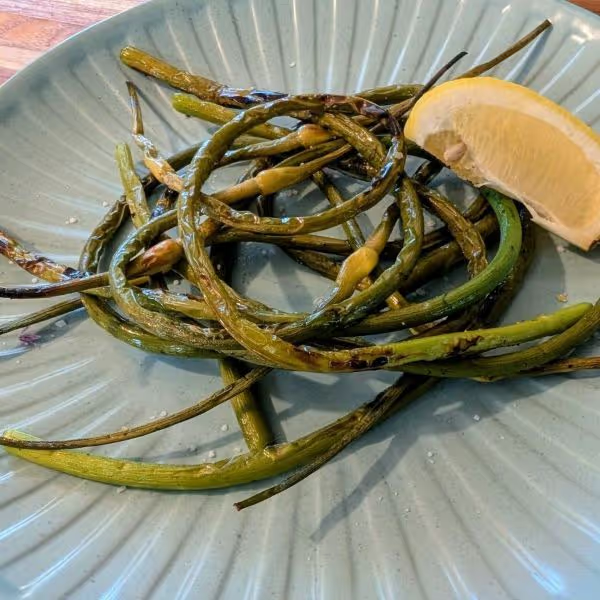
Garlic scapes are one of those fleeting seasonal ingredients that show up in your CSA box in early summer, then disappear just as quickly. With their curly stems and mellow garlic flavor, they’re both striking and versatile—especially when grilled. High heat gives them a smoky char while keeping their crisp-tender texture intact. A quick toss in olive oil before they hit the grill, then a finishing sprinkle of salt, pepper, and a hit of lemon juice, is all they really need.
This is a dish that doesn’t require a lot of fuss. The garlic scapes soften just enough on the grill to lose their raw edge while still holding onto their bite. Their flavor lands somewhere between fresh garlic and asparagus, with a little extra sharpness that mellows as they cook. Whether you're tossing them onto a plate of grilled meats or piling them on top of flatbread, grilled garlic scapes offer an easy way to add something special to the table.
Their simplicity is part of the appeal. With just a few pantry staples and a handful of minutes, this recipe delivers a side dish that tastes like summer.
Store leftover grilled garlic scapes in an airtight container in the fridge for up to 3 days. To reheat, toss them briefly in a hot skillet or warm them in a 350°F oven for about 5–7 minutes. They can also be chopped and added cold to salads, grain bowls, or omelets.

Cauliflower has a well-earned reputation as a versatile ingredient, but when it's sliced into thick steaks, rubbed with spices, and grilled until golden and tender, it becomes something truly memorable. The edges crisp up over the heat while the center turns buttery and rich. It's the kind of transformation that only fire—or a really hot grill pan—can deliver.
This recipe leans into bold Middle Eastern flavors with a spice blend of cumin, coriander, turmeric, and cinnamon that complements cauliflower’s earthiness without overwhelming it. A bright yogurt sauce with lemon, parsley, mint, and garlic cools things down and rounds everything out. Served over a bed of sauce, each steak is layered with contrast—smoky and creamy, savory and fresh.
It’s a standout option for a plant-based dinner, hearty enough to anchor the meal without needing to compete for attention. Grill a few extra steaks and you’ve got lunch ready for the next day, too.
These cauliflower steaks work beautifully as the centerpiece of a meal. Try pairing them with:
Store leftover cauliflower steaks and yogurt sauce separately in airtight containers. The cauliflower will keep well for up to 4 days in the refrigerator. To reheat, place the steaks in a 375°F oven or toaster oven for 10–12 minutes until warmed through and edges are crisped again. The yogurt sauce can be used cold, stirred before serving, or brought to room temperature for a smoother texture. Avoid microwaving the yogurt sauce, as it may separate.
For the Cauliflower Steaks:
For the Herbed Yogurt Sauce:

Few things hit the comfort food sweet spot like homemade pierogi. This version pairs creamy mashed Yukon Gold potatoes with the punchy tang of sauerkraut and the richness of sharp cheddar cheese, all wrapped in a tender dough. Boiled until pillowy and optionally pan-fried until crisp and golden, these pierogi are a main dish that feels both rustic and indulgent.
The filling hits a balance of creamy, savory, and sour, with a generous amount of sauerkraut to keep things lively on the palate. The dough is simple but supple, made with just 4 ingredients. Whether served with sautéed onions and sour cream or straight from the skillet, these pierogi are well worth the effort.
They also hold up beautifully to customization, freezing, and reheating—making them a great option to prepare ahead for busy weeks or to serve when you want to impress without resorting to anything fancy.
Store cooked pierogi in an airtight container in the fridge for up to 4 days. To reheat, either:
You’ll want to boil the pierogi first, then cool completely. Freeze in a single layer before transferring to a container. To reheat, either:
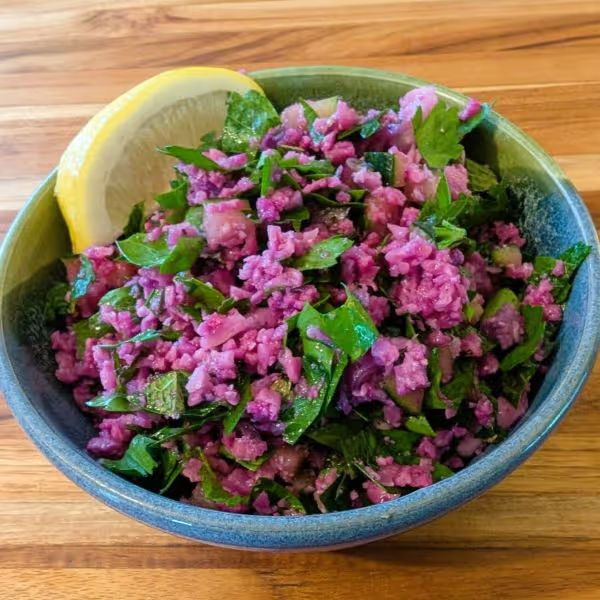
Purple cauliflower adds bold color and a subtle nuttiness to this reimagined tabbouleh. Riced and lightly sautéed in olive oil to remove the bitter bite, the cauliflower takes the place of traditional bulgur, keeping the dish light while delivering just enough warmth and richness to anchor the herbs and lemon. Crisp cucumber and a hit of fresh garlic round out the texture and flavor.
This dish comes together quickly and holds its texture beautifully, making it a strong option for meal prep or entertaining. With no bulgur to soak or cool, prep is simple and flexible whether you grate your cauliflower by hand or pulse it in a food processor.
Tabbouleh is a staple for any mezze platter. Try serving it alongside these other mezze classics:
Leftover tabbouleh should be stored in an airtight container in the refrigerator for up to 2 days. While it’s best enjoyed fresh, the flavors continue to develop as it rests. If you’ve added tomatoes or other watery ingredients, consider draining off any excess liquid before serving.
Reheating is not recommended since this dish is meant to be served chilled or at room temperature. Just give it a stir and taste for seasoning before serving again—adding a small splash of lemon juice or olive oil can help revive the flavor.
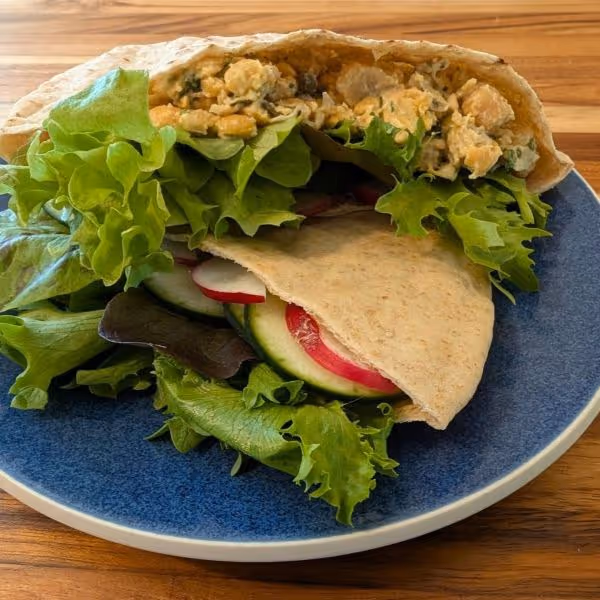
This recipe delivers bold flavor with minimal effort—exactly what a weekday lunch should be. Mashed chickpeas are combined with briny capers, fresh herbs, and a creamy Dijon dressing to create a salad that's tangy, savory, and full of texture. Stuffed into a pita with crisp lettuce, cool cucumbers, and peppery radishes, it hits all the right notes for something light but filling.
It’s the kind of meal that feels both clean and satisfying. There’s no cooking involved, just a few minutes with a fork and a knife. And because the flavors hold up so well, it’s also a great option for prepping ahead and packing for lunch—whether you're heading to the office, the park, or just need something quick from your own fridge.
There’s plenty of room to adapt this recipe based on what’s in your fridge or pantry.
Store the chickpea salad separately from the vegetables and pita to keep everything fresh. It will keep in the refrigerator in an airtight container for up to 3 days. The flavors may even improve after a few hours as the herbs and capers infuse the chickpeas.
When you're ready to eat, give the salad a quick stir and assemble the sandwiches just before serving to keep the veggies crisp and the pita from getting soggy. For an easy lunch, pack the components separately and build your pita pocket on the spot.
For the Chickpea Salad:
For the Sandwiches:
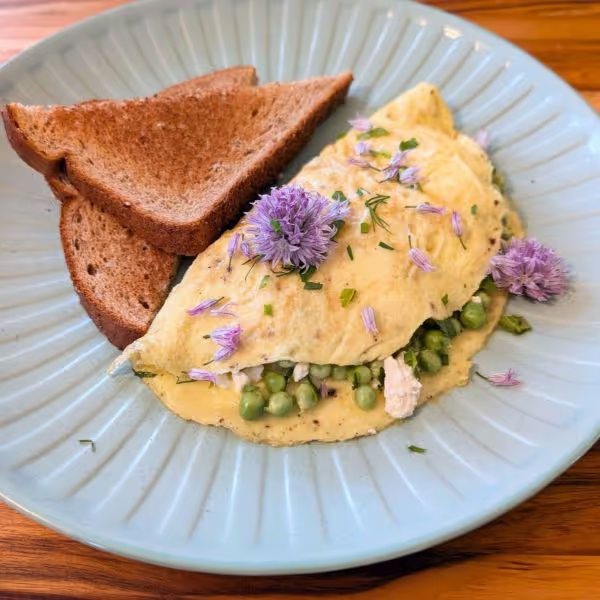
When spring produce starts arriving from the CSA, quick meals that highlight fresh herbs and vegetables are essential. This omelet is built around just that—a handful of peas, a scattering of chive blossoms, and a mix of tender herbs folded into softly cooked eggs. It’s easy to prepare but feels bright and seasonal, with just enough detail to make it special.
The chive blossoms are more than just a garnish. Their mild onion flavor adds subtle depth and balances the sweetness of the peas and richness of the eggs. Combined with creamy goat, this omelet hits a perfect balance of texture and taste without weighing you down. It’s the kind of breakfast—or lunch—that keeps you feeling connected to the garden.
This omelet is endlessly adaptable to what’s in your kitchen or CSA box:
Keep it simple and seasonal. This omelet pairs well with:
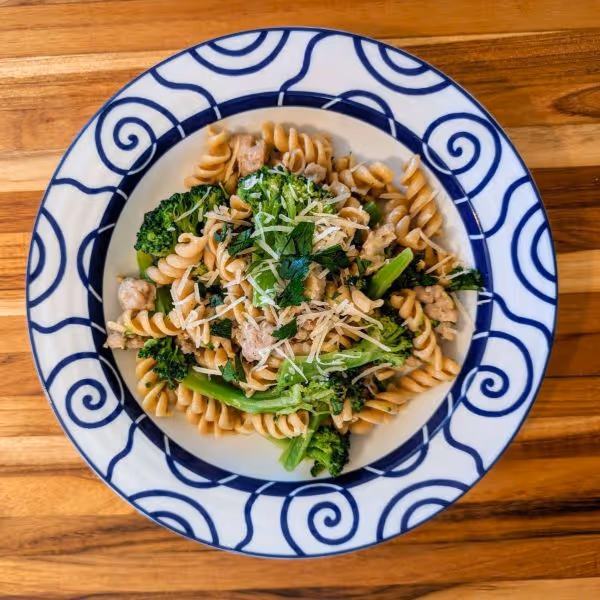
This sausage and broccoli pasta hits that perfect balance of hearty and fresh. You get rich, savory flavor from browned Italian sausage, a little sharpness and lift from white wine, and nutty Parmesan to pull it all together. Toss in vibrant broccoli and al dente pasta, and the result is a one-pan dinner that tastes like it took more effort than it did.
The sauce is light but full of depth, and it clings beautifully to the noodles thanks to a quick simmer with chicken stock and a finishing splash of pasta water. Garlic and red pepper flakes lend just enough warmth to wake everything up. It's the kind of dinner you can pull off on a weeknight but would gladly serve to friends on the weekend.

Pickled turnips are a staple of Lebanese cuisine, found tucked into falafel wraps, lining mezze platters, and served alongside grilled meats and creamy dips. Their signature bright pink hue comes from a few slices of raw beet added to the jar—a clever touch that’s as traditional as it is eye-catching. Tangy, crunchy, and sharp with a hint of spice, they bring balance to rich and savory dishes with every bite.
This version adds a few flavorful twists while keeping the classic structure intact. Red pepper flakes introduce a gentle heat, and a spoonful of pickling spice deepens the brine with warm, aromatic notes. Made as a fridge pickle, this batch comes together quickly with no canning required—just slice, simmer the brine, and let time do the rest.
Store the pickled turnips in a sealed quart jar in the refrigerator. They’ll be ready to eat in 4–5 days, but the flavor and color deepen over the course of a week. They'll keep well for 1 month in the fridge. Always use clean utensils to remove pickles from the jar to avoid introducing bacteria that could shorten their shelf life.

When chive blossoms are in full bloom, they don’t just belong in vinegar or tucked into salads. Their soft onion flavor and striking color make them perfect for infusing salt—especially when paired with fresh lemon zest. The result is a finishing salt that’s equal parts fragrant, punchy, and pretty enough to gift.
Making infused salt is one of the easiest ways to capture fleeting seasonal flavors. You only need a few minutes of prep time and a handful of ingredients—no special equipment, no canning, no fuss. Just mix, dry, and store. The lemon lifts the floral notes of the chive blossoms and balances their savory sharpness, creating a seasoning that feels special without being fussy.
This is the kind of pantry staple that helps you use more of what’s already arriving in your CSA share. It’s also a practical way to make the most of small harvests or that last bundle of blossoms from your share. One batch makes about half a pint—plenty to keep by the stove and sprinkle generously.
This infused salt keeps well for several months in an airtight container, making it an easy way to bring the flavor of spring into your meals long after the blossoms are gone.

Spring and early summer bring a flood of fresh produce, and some of the most fleeting treats are the ones that grow quietly in the margins—like chive blossoms. These lavender-colored globes often show up in CSA boxes alongside tender greens and herbs. Infusing vinegar with them is one of the easiest ways to stretch their flavor and beauty into the weeks ahead.
The process takes just a few minutes of active time and rewards you with a pale pink vinegar that tastes as good as it looks. Milder than raw onion or garlic, chive blossoms lend a soft allium note that works surprisingly well in both bold and delicate recipes. It's a great example of how seasonal cooking doesn’t have to be complicated—it just has to start with something fresh and local.
Even a small bunch of blossoms can make a jar, and once you try it, you might find yourself watching you spring boxes like a hawk. The vinegar brightens anything it touches and plays especially well with early summer vegetables, delicate greens, and dishes that benefit from a little acidity.
This vinegar shines in places where you’d usually reach for white wine vinegar or lemon juice. A few ideas to get started:
Don’t toss the spent blossoms once the infusion is done. They’re still packed with flavor and make a great garnish or finishing ingredient:
The blossoms keep well in the fridge for several weeks, especially if stored in a bit of the strained vinegar. They’re tangy, floral, and a little unexpected—exactly the kind of ingredient that makes everyday dishes feel just a bit more special.
Curtido is bold, bright, and delightfully sour with just the right hint of heat. A cousin to sauerkraut with roots in Salvadoran cuisine, this version balances shredded cabbage, grated carrot, sliced onion, diced jalapeño, and dried oregano. It’s not just a slaw—it’s a living, breathing, probiotic-rich condiment that brings a sharp, refreshing crunch to anything it touches.
Curtido is a very short and simple fermentation, making this a great recipe for people of all fermentation skill levels. With some salt, a clean jar, and a little patience, the vegetables do most of the work. Letting them ferment for a few days at room temperature develops flavor that’s far deeper than anything you’ll get from vinegar-based pickling. Plus, you’ll have the satisfaction of making something with your own hands that keeps well and elevates meals across the board.
If you're new to fermenting, it’s worth taking a few minutes to understand the basic tools, techniques, and safety tips involved. Head over to this post for a practical primer. It covers everything from choosing jars to what to expect during the bubbling phase, so you can start with confidence.
Curtido shines alongside pupusas, its most traditional pairing, but it’s just as happy dressing up tacos, grain bowls, burgers, or pulled pork sandwiches. Add it to avocado toast or scrambled eggs for a punch of acidity and crunch, or serve it as a zippy contrast to grilled meats.
Once your curtido has fermented to your liking, move the jar to the refrigerator. The cold slows fermentation to a crawl, preserving the flavor and texture. Keep the vegetables submerged under brine at all times to prevent spoilage. Use a clean utensil each time you scoop some out, and it should stay good for several months—often even longer. If you ever notice mold, an off smell, or sliminess, it’s time to discard and start fresh. But under clean conditions, fermented vegetables are remarkably shelf-stable and low-maintenance.
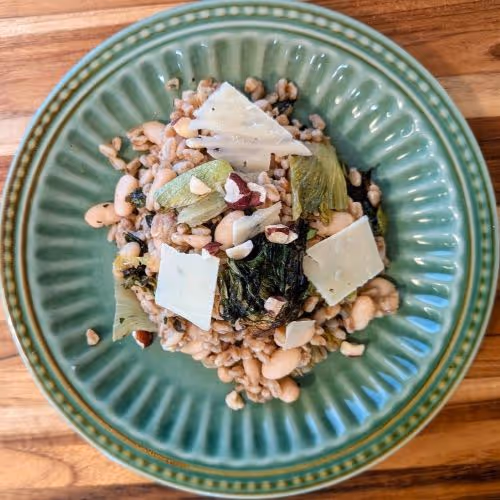
Castelfranco radicchio is a winter gem with its creamy speckled leaves and gentle bitterness. Roasting it coaxes out a subtle sweetness and softens its texture, creating the perfect foil for chewy farro and tender white beans. Tossed with a bold balsamic vinaigrette, this salad is hearty enough to stand on its own while still feeling fresh and balanced.
The interplay of warm grains, roasted leaves, and earthy legumes makes this dish feel grounded and nourishing. It’s exactly the kind of thing to reach for on a cool day, when you want something comforting but not heavy. The radicchio’s natural bitterness holds its own next to the balsamic, while the beans and farro make it satisfying enough to serve as a main course.
It also keeps surprisingly well, which makes it a smart choice for meal prep or weekday lunches. Whether you’re trying to work more whole grains into your meals or just want a new way to enjoy radicchio, this dish hits all the right notes.
Customizing This Dish

Homemade sauerkraut is one of those kitchen projects that feels almost magical. With just cabbage, salt, and a little patience, you get something deeply flavorful, gut-friendly, and surprisingly versatile. It’s a slow transformation that doesn’t demand much—just a clean jar, a bit of countertop space, and the willingness to wait a week or two.
This small-batch recipe makes one quart, ideal for first-time fermenters or those with limited storage space. It uses a 2.5% salt-to-cabbage ratio by weight, which creates a safe, stable environment for beneficial bacteria to thrive. Sterilizing your jar and fermentation weights ensures a clean start, and from there, it’s just a matter of checking in daily as your kraut gets bubblier and tangier.
If you're new to fermenting, it’s worth taking a few minutes to understand the basic tools, techniques, and safety tips involved. Head over to this post for a practical primer. It covers everything from choosing jars to what to expect during the bubbling phase, so you can start with confidence.
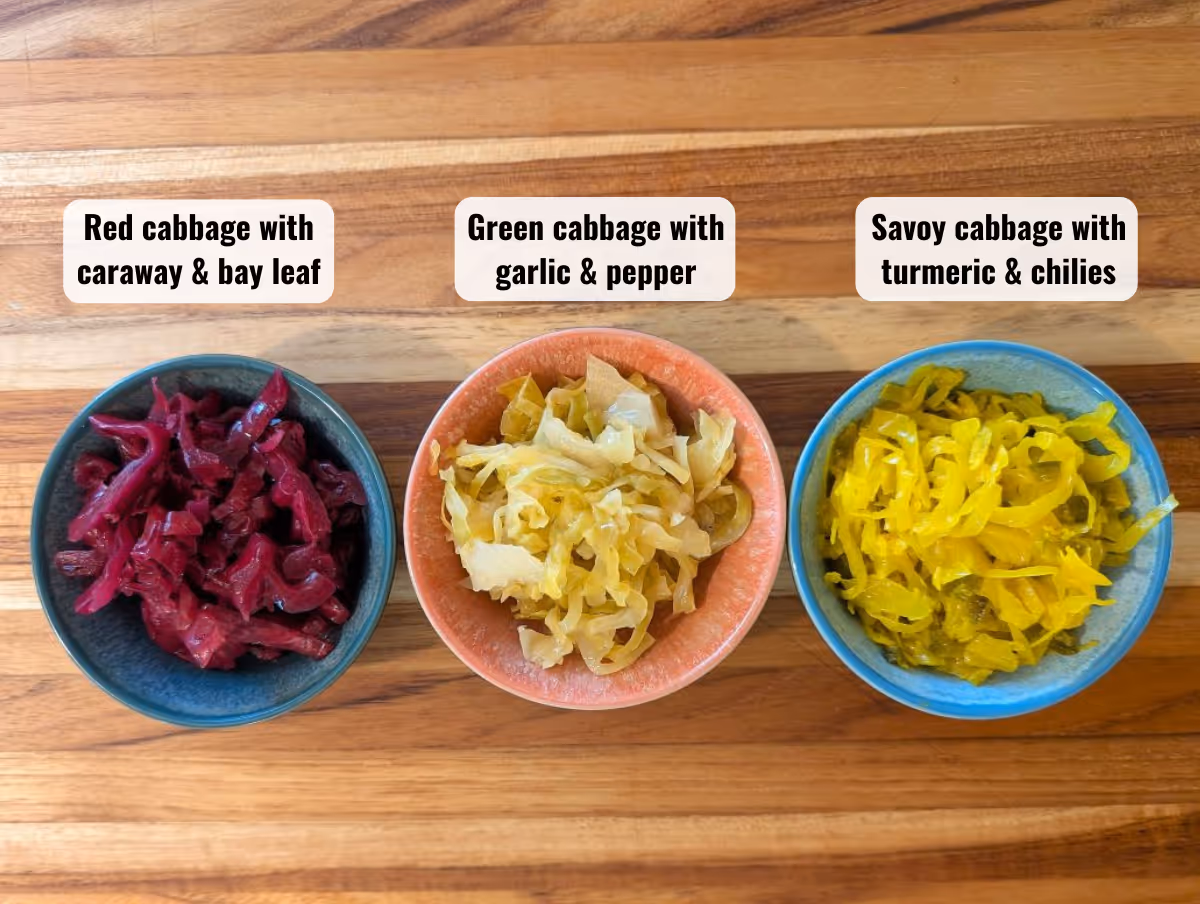
It’s easy to keep things classic, but a few small additiona can change the entire flavor profile. Whether you want something traditional with caraway or bold with garlic and chili, this is the kind of recipe that works hard for you long after it’s jarred. Consider spicing things up with one (or a combo) of these;
While green cabbage is the traditional and most commonly used variety for sauerkraut due to its high water content and mild flavor, you can experiment with other types of cabbage for different textures, colors, and tastes:
Once your sauerkraut has reached the flavor you like, remove the fermentation weight and transfer the jar to the refrigerator. Kept cold and submerged in brine, it will stay crisp and flavorful for up to six months. Always use a clean utensil when serving to avoid contamination.
If you want to make it shelf-stable, you can water-bath can it. Just note that heat processing will destroy the live probiotic cultures, which are part of what makes raw sauerkraut so beneficial for gut health. For most people, the refrigerated version is the best way to enjoy both its flavor and function.
Optional Add-Ins (choose 1–3):
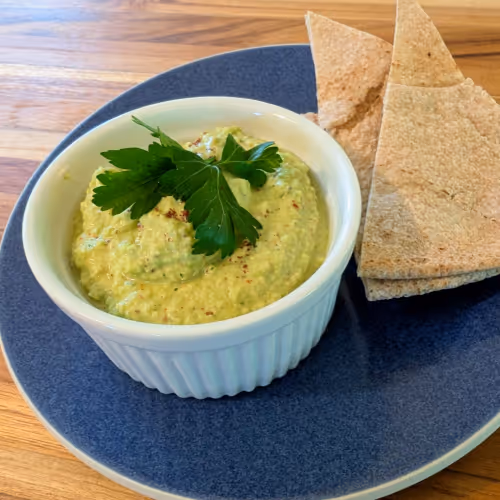
Fava beans are one of spring’s most rewarding ingredients. Their bright green color and nutty flavor bring a freshness that dried or canned legumes can’t match. Blended into a hummus, they create a creamy dip that feels both familiar and new.
This hummus has a natural richness from tahini and olive oil, but it’s balanced with lemon juice and just the right touch of heat. It’s earthy, fresh, and full of character, the kind of spread that belongs on a spring mezze platter but holds its own as the centerpiece of a weekday lunch. A bowl of this on the table with warm flatbread, crisp vegetables, or roasted potatoes and it’s hard to think of a better snack—or meal.
While this recipe calls for Aleppo pepper, sumac, and fresh parsley, that is only one of many flavoring combos that work well in this hummus. If you don’t have those spices, or you’re looking for a different flavor profile, try one of these;
This hummus is a natural with warm pita or flatbread, but it’s just as good spread onto toast and topped with sliced radishes, cucumbers, or leftover roasted veggies. Serve it as part of a mezze board with olives, pickles, and marinated feta, or dollop it into grain bowls in place of dressing. It makes a great sandwich spread too—especially paired with greens, grilled eggplant, or halloumi.
For a light lunch or starter, try spooning it into endive leaves or using it as a base for deviled eggs by mixing a little with the yolks.
Keep any leftover hummus in an airtight container in the refrigerator for up to 4 days. Give it a quick stir before serving, and if it seems a little stiff, loosen it with a splash of water or a drizzle of olive oil. This dip isn’t ideal for freezing—its texture tends to suffer—so enjoy it while it’s fresh.

CSA boxes are a gift to any kitchen, but they sometimes come with a challenge: an avalanche of greens. That’s where this freezer-friendly saag sauce steps in. It’s a flavorful, Indian-inspired green sauce you can make in bulk, stash in your freezer, and bring out whenever you need a fast, hearty meal.
This recipe turns a mountain of greens into a silky, spiced sauce that can transform anything from a can of chickpeas to leftover roast chicken into something comforting and deeply satisfying. It doesn’t require a specific combination of greens, and it’s easy to adjust depending on what’s in your fridge—or your CSA share. Once thawed, you can finish the sauce with a splash of cream or a pat of butter, fold in cooked potatoes or paneer, and dinner is ready in minutes.
Saag sauce is a spiced purée of leafy greens traditionally used in Indian cooking, where “saag” simply refers to cooked greens. While the most well-known version in North America is saag paneer—a creamy spinach-based dish with cubes of cheese—saag in India varies widely depending on the region and available greens. It’s meant to be flexible, hearty, and deeply flavorful, making it an ideal foundation for a wide variety of add-ins like meat, legumes, or vegetables.
This sauce makes weeknight dinners incredibly easy. Once thawed and reheated, try these serving ideas:
Leftover saag sauce can be stored in an airtight container in the fridge for up to 4 days. Reheat gently in a saucepan over medium heat or in the microwave, stirring occasionally and adding a splash of water if it’s too thick.
Portion the fully cooked and cooled sauce into freezer-safe containers or silicone molds (½ to 1 cup portions work well). Label and date them, then freeze flat if using bags. The sauce will keep for up to 3 months.
To reheat, thaw overnight in the fridge or warm directly from frozen in a covered saucepan over low heat with a splash of water. Stir occasionally to break up the sauce as it thaws. Add your desired cream, butter, or mix-ins once it’s hot and smooth.
Tempering Spices (Optional But Recommended)

If you're a fan of snickerdoodles but want to try something a little different, Pear Butter Snickerdoodles are the perfect treat. This take on the classic cookie uses pear butter for an extra layer of flavor, making the cookies soft, chewy, and wonderfully fragrant. The hint of cinnamon pairs beautifully with the natural sweetness of the pear butter, creating a dessert that feels familiar but with a delightful twist. Whether you’re baking for a special event or just to enjoy with a cup of tea, these cookies bring comfort in every bite.
If you have any cookies left (which is rare!), store them in an airtight container at room temperature for up to 5 days. To keep them fresh and soft, place a piece of parchment paper between layers of cookies to prevent them from sticking together.
To freeze baked Pear Butter Snickerdoodles, arrange them in a single layer on a baking sheet and place them in the freezer until firm (about 1-2 hours). Once frozen, transfer the cookies to an airtight container or a freezer bag. They will stay fresh for up to 3 months. When you're ready to enjoy them, simply thaw at room temperature for a few minutes, or heat them gently in the oven for a few seconds to warm them up.
Freezing the dough is another great option if you want to bake fresh cookies later. After preparing the dough, roll it into balls and coat them in the cinnamon-sugar mixture. Arrange the dough balls on a baking sheet and freeze until firm (about 1-2 hours). Once frozen, transfer the dough balls to a freezer bag or airtight container and store them for up to 3 months. To bake, simply place the frozen dough balls on a baking sheet and bake as directed, adding an extra minute or two to the baking time.
Cinnamon Sugar Mix

There’s something deeply satisfying about a sauce that comes together in five minutes and completely transforms a meal. Chimichurri is a raw herb condiment from Argentina that hits all the right notes: vibrant parsley, sharp garlic, tangy vinegar, a hit of chili, and plenty of olive oil. It's assertive but balanced, and once you taste it, you’ll start thinking of excuses to spoon it onto everything.
It’s traditionally served with grilled steak, but this version leans just enough toward versatility that you can drizzle it over roasted potatoes, swirl it into a bowl of rice and beans, or spoon it over a fried egg. It doesn’t rely on obscure ingredients or special tools. As long as you’ve got a food processor, you're good to go.
Chimichurri shines brightest when served with grilled meats, especially steak, lamb, or chicken. It’s equally welcome drizzled over roasted vegetables like carrots, cauliflower, or squash. Spoon it over fried or poached eggs for a punchy breakfast, or use it as a spread in sandwiches or wraps. Try mixing it into cooked grains like farro or quinoa for an herby grain salad, or add a spoonful to a bowl of lentils for extra flavor.
It also plays well as a dipping sauce—serve it alongside warm crusty bread or crispy potatoes. And if you’re grilling halloumi, tofu, or portobello mushrooms, chimichurri gives them an earthy lift.
Chimichurri keeps well in the fridge for up to one week. Store it in a sealed jar or container, and if you plan to use it over several days, cover the surface with a thin layer of olive oil to help prevent oxidation.
To freeze, spoon chimichurri into an ice cube tray and freeze until solid. Transfer the cubes to a zip-top bag or airtight container and store for up to 3 months. Thaw a cube or two as needed—perfect for dressing up a quick weeknight dinner.
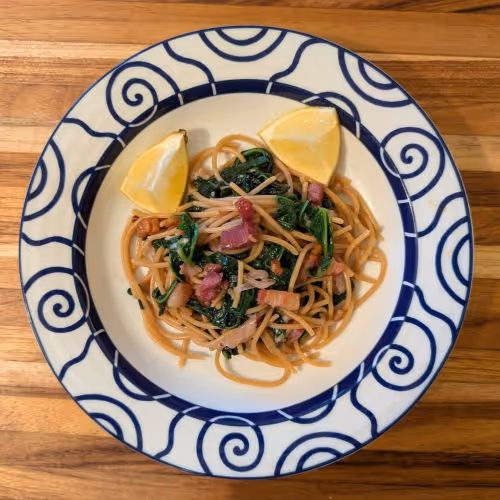
This is the kind of meal that earns a regular spot in your dinner rotation. Salty bits of crisped pancetta mingle with tender strands of spaghetti and wilted mustard greens, all coated in a light lemon parmesan sauce that clings to every bite. It’s fast, punchy, and anchored by ingredients that know how to wake up a bowl of pasta.
The magic here is in the contrast: the bitterness of mustard greens balanced by the richness of pancetta, the tart brightness of lemon, and just a hint of crushed red pepper to make things interesting. The entire dish comes together in one skillet (plus a pot for the pasta), which makes cleanup a breeze—and the flavor payoff is far greater than the effort it takes to throw together.
Transfer leftovers to an airtight container and refrigerate for up to 3 days. To reheat, add a splash of water or broth to a skillet over medium-low heat, then stir in the pasta and cover briefly to steam. Stir frequently until warmed through. Avoid microwaving if you can—reheating on the stovetop helps the greens regain their texture and prevents the pasta from becoming gummy.

Parsnips often play second fiddle to potatoes, but they deserve a moment in the spotlight. Their natural sweetness, especially when cooked until tender and blended with butter and cream, turns into something that’s earthy, rich, and deeply satisfying. A few cloves of garlic simmered right alongside add warmth, while chopped fresh chives offer a bright contrast that keeps the whole dish feeling fresh.
This recipe is all about comfort without monotony. It’s simple enough for a weeknight meal but refined enough to sit proudly on a holiday table. The texture is creamy, the flavor is balanced, and the process is straightforward. Once you try them, these mashed parsnips may just become your go-to alternative to mashed potatoes.
Store any leftover mashed parsnips in an airtight container in the refrigerator for up to 4 days. Reheat in a saucepan over low heat, stirring frequently, and add a splash of half and half or milk to loosen the texture if needed. You can also microwave in short bursts, stirring between each interval.
Mashed parsnips freeze well. Let them cool completely, then spoon into a freezer-safe container or zip-top bag, pressing out as much air as possible. Freeze for up to 2 months. Thaw in the fridge overnight, then reheat gently on the stovetop with a bit of added liquid to restore creaminess, or microwave in short increments, stirring occasionally.

Rainbow chard deserves more attention in the kitchen. Its colorful stems and deep green leaves make any dish look stunning, but it’s the earthy, slightly sweet flavor that makes it truly special. A quick sauté in olive oil with shallots and garlic highlights its natural character, while a splash of lemon juice at the end brightens everything up.
This dish is as simple as it gets, but that’s what makes it so good. With just a handful of ingredients and about ten minutes of cooking time, it’s a side dish that fits into any meal without effort. It pairs well with everything from roasted vegetables to hearty mains, adding freshness and a little touch of elegance to the plate.
This chard works well with a variety of dishes:
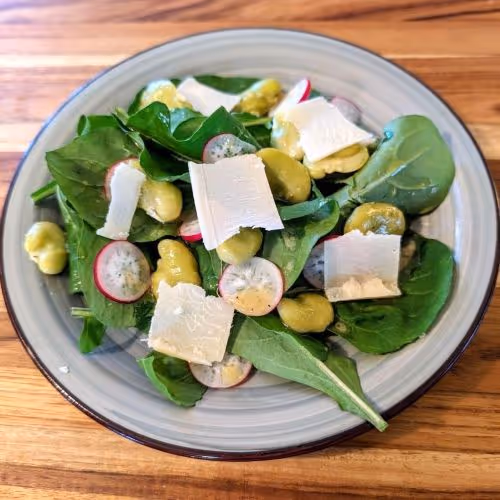
There’s a sweet spot in spring when fresh fava beans finally show up in your CSA box and arugula is at its peppery peak. That’s when this salad earns its place on the table. It doesn’t take much—just a handful of thoughtfully chosen ingredients and a lemony vinaigrette that ties everything together. It’s crisp, bright, and balanced, with a contrast of flavors and textures that keeps each bite interesting.
Fava beans are one of those ingredients that feel a little special, especially when you take the time to prep them properly. Blanched and shelled, they bring a creamy texture that complements the sharpness of radish and the nutty depth of shaved parmesan. Tossed over a bed of arugula with a vinaigrette that leans hard on lemon, it’s the kind of dish that delivers freshness without fuss.
This salad works beautifully on its own, especially as a light lunch, but it also plays well with others. The flavor profile is flexible, the ingredients are forgiving, and it’s easy to double or adjust to fit whatever you’ve got going on in your kitchen that day.
This salad pairs especially well with grilled chicken or fish, making it a strong side for a spring cookout. For a vegetarian option, serve it next to a frittata or a tart filled with leeks, goat cheese, or mushrooms. Add a crusty loaf of sourdough or a slice of focaccia and you’ve got a simple, satisfying meal that makes the most of the season’s best.
For the Salad
For the Dressing
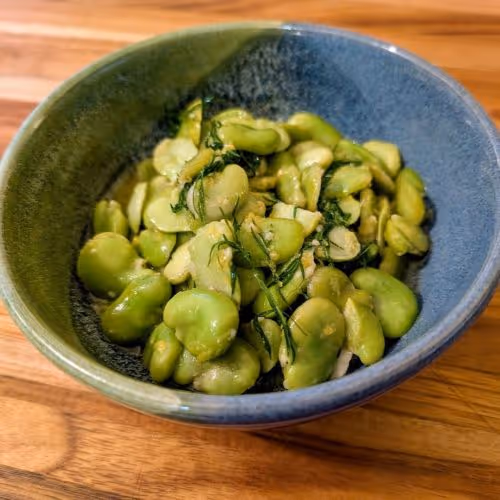
Fresh fava beans have a way of making you work for them. First, they lure you in with their plump, inviting pods, only to reveal that inside, each bean is wrapped in a second layer of skin that needs peeling. But put in the effort, and you’re rewarded with something undeniably special — creamy, nutty, and just a little bit sweet. A quick blanch and a simple marinade turn them into a bright, herbaceous delight that tastes like spring in a jar.
This marinated fava bean recipe is all about keeping things simple. No need for a long ingredient list or complicated steps—just good olive oil, a little vinegar for balance, plenty of fresh dill, and the zing of lemon zest. The beans soak up all that goodness, transforming into something you’ll want to scoop straight from the jar.
Snack Straight from the Jar
There’s no shame in the direct approach. These beans are addictive enough to eat by the spoonful, one bite leading to another until you’ve made it through half the jar without realizing it.
Toss Them in a Salad
Marinated fava beans add a little burst of flavor to just about any salad. Toss them with crisp greens, cucumbers, and feta, or mix them into a grain salad with quinoa or farro for something heartier.
Pile Them on Toast
Crusty bread, a swipe of ricotta or labneh, and a spoonful of these beans make an easy, elegant snack. For extra flavor, finish with a drizzle of olive oil and a pinch of flaky salt.
Add to a Grain Bowl
Warm rice, barley, or bulgur makes the perfect backdrop for these beans. Pair with roasted vegetables, a dollop of yogurt, and a handful of nuts for a satisfying meal.
Serve with Roasted Vegetables
Spoon marinated fava beans over roasted carrots, potatoes, or zucchini for an herby, lemony contrast to their caramelized sweetness.
Whichever way you use them, these beans bring brightness and fresh flavor to any meal. They won’t last long, so don’t be surprised if you find yourself making another batch soon.
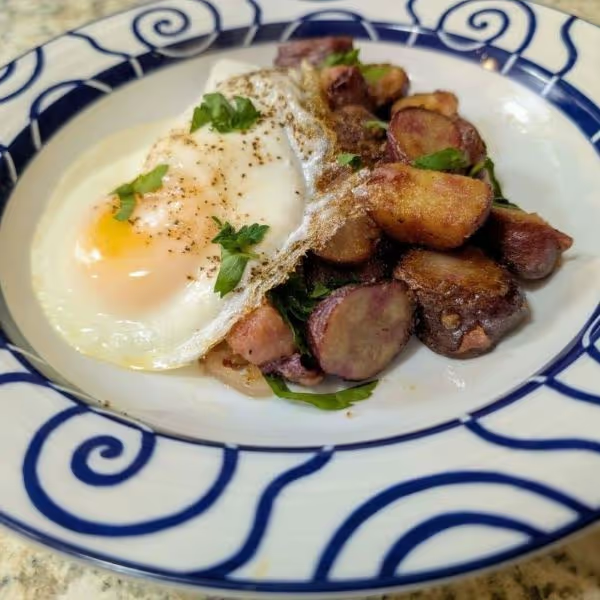
Ozette potatoes are a true heirloom treasure, cultivated for centuries by the Makah Tribe of the Pacific Northwest after they were introduced by Spanish explorers in the late 18th century. Unlike more common potato varieties, these small, knobby tubers have a thin golden skin, a creamy interior, and an earthy, slightly nutty flavor that makes them ideal for pan-frying.
In this dish, the Ozette potatoes are sliced and crisped to golden perfection in a pan alongside savory pancetta and shallots. The dish is finished with a fried egg, its runny yolk creating a rich sauce that ties everything together. With a balance of crisp, creamy, and savory elements, this breakfast is deeply satisfying and easy to prepare, making it an excellent choice for a weekend morning or a special brunch.
Store leftover pan-fried potatoes and pancetta in an airtight container in the refrigerator for up to 3 days.
To reheat, heat a pan over medium heat, adding a small amount of oil or butter. Sauté the potatoes and pancetta until warmed through and crisp. Or, spread leftovers on a baking sheet and reheat at 350°F for about 10 minutes.
For the best texture, fry a fresh egg when serving reheated potatoes instead of storing and reheating an already-cooked egg.

Nothing says fall quite like pumpkin, and these pumpkin butter pancakes bring that seasonal flair straight to your breakfast table. Imagine a fluffy stack, golden brown with just the right amount of crisp edges and a soft, warm center. But it’s the secret ingredient that takes them over the top: rich, homemade pumpkin butter. This isn’t your average pumpkin flavor—it’s an intense blend of warm spices and smooth pumpkin, sweetened just enough with maple syrup to feel indulgent but balanced for that perfect bite.
These pancakes are for anyone who craves a little autumn in every bite. They’re quick enough for weekday breakfasts but feel luxurious enough for lazy weekend brunches. Serve them with a touch of maple syrup and chopped pecans and get ready for the cozy vibes to set in.
Should you find yourself with leftovers (although that’s rare with these beauties!), store them in an airtight container in the fridge for up to 3 days. To reheat, simply pop the pancakes in a nonstick skillet over low-medium heat, flipping once, until they’re warmed through. You can also reheat them in the microwave by stacking a few on a plate, covering them with a damp paper towel, and heating for 30–45 seconds.
Pumpkin butter pancakes are great for batch-making and freezing, which means you can keep a stash for those cozy mornings when you need an instant treat. Lay the pancakes in a single layer on a baking sheet lined with parchment paper and freeze for about an hour. Once they’re solid, transfer them to a freezer-safe bag or container and store for up to 3 months.
When you’re ready to enjoy them again, you have options. Either toast them in the oven at 350°F for about 10–12 minutes or pop them in the microwave for 1–2 minutes, flipping halfway through. For an extra touch of crispness, finish them in a hot skillet for a minute or so on each side after microwaving.
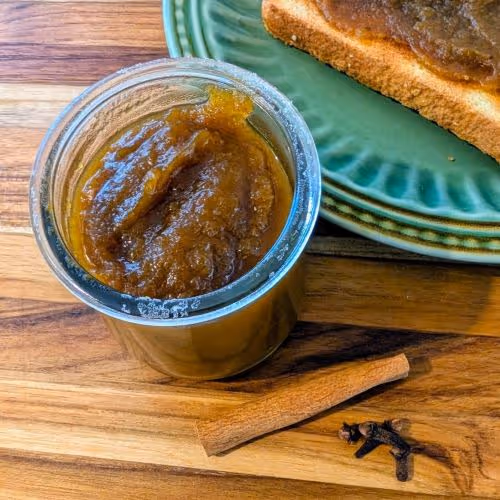
There’s something magical about making your own pumpkin puree, especially when it leads to a jar of maple pumpkin butter that you can enjoy on just about anything. It’s the kind of recipe that captures the essence of fall—rich, spiced, and slightly sweet, with the deep, caramel notes of roasted pumpkin.
The best part? It’s not overly sweet. The maple syrup gives it just the right touch of natural sweetness without overpowering the warm spices like cinnamon, ginger, and nutmeg. Whether you’re trying to impress your family with something homemade or simply want to savor the season, this spread is your go-to for cozy mornings or holiday gatherings.
For the Pumpkin Puree
For the Maple Pumpkin Butter
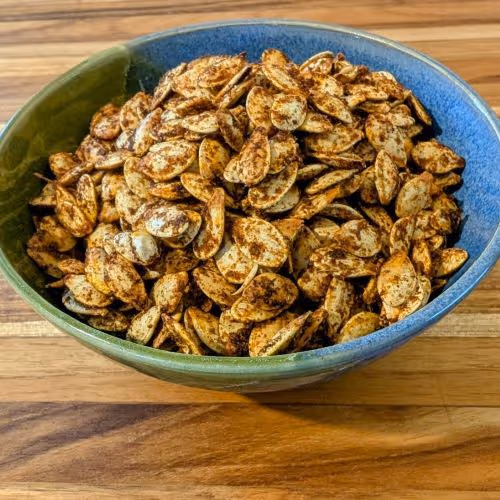
Pumpkin carving is fun, but let's be honest—one of the best parts is what you can do with those seeds. Roasted pepitas, with their crispy texture and endless seasoning possibilities, make the whole pumpkin process worth it. These little seeds are a blank canvas for bold flavors.
And trust me, they’re not just for munching straight from the bowl (though they’re pretty irresistible that way). With just a bit of olive oil, some pantry spices, and about 15 minutes in the oven, you'll have a batch of golden, crunchy pepitas. Spicy, smoky, sweet, or herby—whatever mood strikes, there's a flavor combination to match. They’re easy, versatile, and absolutely addictive.
Pepitas are the snack that keeps on giving. They're not only delicious straight out of the oven, but they can also elevate your meals in all sorts of ways:
Smoky & Spicy
Sweet & Cinnamon
Savory Herb

It’s that time of year when CSA boxes are overflowing with fall’s finest produce, and delicata squash is one of those seasonal gems that deserves the spotlight. Pair it with the smoky depth of Spanish chorizo, caramelized onions, and fresh sage, and you’ve got a savory filling that’s begging to be wrapped in a homemade crust. This Delicata Squash and Chorizo Hand Pie recipe is everything you want in a cozy, autumn dish—comforting, flavorful, and portable. Whether you’re packing lunch for work, serving them at a dinner party, or freezing a batch for later, these hand pies hit the spot every time.
The hot water pastry dough might sound old-fashioned, but it’s a dream to work with—pliable and forgiving, perfect for encasing that delicious filling. Plus, zero need to bust out your pastry knife, because this pastry requires no cutting butter in. These hand pies are just the thing to make your fall cooking extra special.
While the combination of roasted delicata squash and Spanish chorizo is a flavor bomb, this recipe is versatile enough for customization:
Store the hand pies in an airtight container in the refrigerator for up to three days. To reheat, simply pop them in a 350°F oven for about 10–12 minutes until the pastry crisps up again. If you’re in a hurry, a quick zap in the microwave will warm them through, though the crust won’t be as crisp.
Hand pies are ideal for freezing, which means you can always have a batch on hand for those busy days.
For the filling
For the Pastry

Flatbread has a way of turning any meal into an elegant affair, especially when topped with a luxurious blend of caramelized onions, crispy bacon, and creamy Gruyère cheese. This recipe takes the convenience of pre-made flatbread and elevates it to new culinary heights. Perfect for a quick weeknight dinner or a sophisticated appetizer for your next gathering, this flatbread is as versatile as it is delicious.
Picture the savory sweetness of caramelized onions mingling with the smoky crunch of bacon, all blanketed by the nutty richness of melted Gruyère. It’s a combination that’s bound to make your taste buds dance. Plus, with the simplicity of using pre-made flatbread, you can have this gourmet dish ready in just minutes.
Store leftover flatbread in an airtight container in the refrigerator for up to 3 days. To reheat, place the flatbread on a baking sheet and warm in a 350°F oven for 10-12 minutes, or until the cheese is melted and the flatbread is heated through.

CSA boxes are a wonderful way to support local farms and enjoy fresh, seasonal produce. But what do you do when you find yourself swimming in onions? The answer is simple: make a big batch of caramelized onions in your slow cooker. These rich, golden onions add a depth of flavor to countless dishes and can be a game-changer in your kitchen. The best part? They can be frozen, so you’ll always have this delicious ingredient on hand.
Caramelized onions are a kitchen essential, perfect for enhancing the flavors of soups, stews, sandwiches, and more. The slow cooker method is a game-changer—set it, forget it, and come back to a pot full of savory, sweet, perfectly caramelized onions. No more standing over a hot stove for hours. Just let the magic happen while you go about your day.
In the Fridge:
In the Freezer:
To use frozen caramelized onions, simply thaw them in the refrigerator overnight or warm them up directly in your dish. Having these flavorful onions ready to go will save you time and add a delicious depth to your cooking.
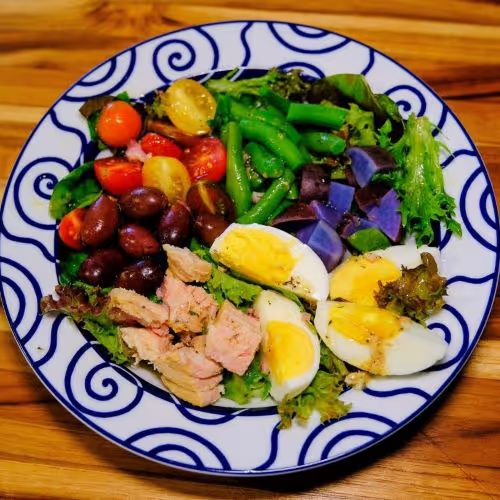
The Nicoise Salad is a timeless classic that effortlessly brings together the best of summer produce into one stunning dish. Our version elevates this traditional favorite with a lemony shallot vinaigrette that adds a bright and tangy flair, perfectly complementing the medley of flavors. The combination of tender potatoes, crisp green beans, juicy cherry tomatoes, and rich, oil-packed tuna creates a harmonious balance that's as delicious as it is nutritious.
Imagine serving this beautiful salad as a centerpiece for a relaxed outdoor lunch or a light dinner. The fresh greens provide a crisp base, while the hard-boiled eggs and olives add layers of texture and flavor. Each bite offers a delightful mix of savory, tangy, and fresh notes, making it an unforgettable culinary experience.
Leftovers from this Nicoise Salad can be a lifesaver for quick meals. Here’s how to keep them fresh:
For the Salad:
For the Lemony Shallot Vinaigrette:

Golden Beet and Farro Salad is the perfect fusion of flavors and textures, ideal for those who appreciate a refreshing yet hearty dish. Roasted golden beets bring a natural sweetness, while farro adds a satisfying chewiness. The fresh spinach provides a crisp base, complemented by the creamy tang of Gorgonzola cheese and the crunch of toasted pecans. The homemade dressing, with its hints of garlic and fresh parsley, ties everything together beautifully.
Whether you're looking to impress guests at a summer gathering or simply want a nutritious and delicious meal, this salad has you covered. Its vibrant colors and harmonious blend of ingredients make it as pleasing to the eye as it is to the palate. Ready to elevate your salad game?
Leftover salad can be stored in an airtight container in the refrigerator for up to 3 days. To keep the ingredients fresh and prevent sogginess, store the dressing separately and add it just before serving.
When ready to eat, you can enjoy the salad cold or let it sit at room temperature for about 15 minutes to take off the chill.
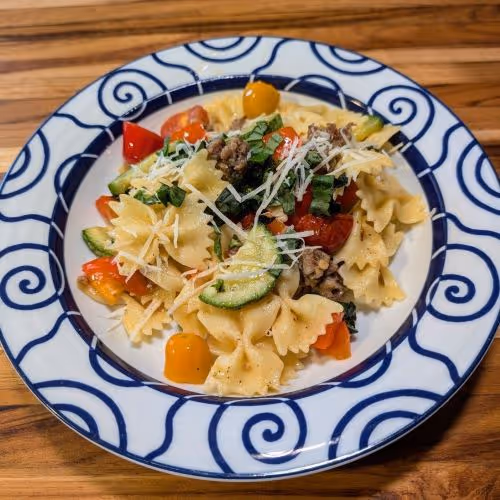
When it comes to weeknight meals, nothing beats the simplicity and satisfaction of a pasta dish that delivers both flavor and flair. This Pasta Primavera with Italian Sausage is a testament to the joys of cooking with fresh, seasonal ingredients. It combines juicy Italian sausage with a colorful medley of zucchini, bell pepper, and cherry tomatoes, all tossed together with pasta and finished with a splash of lemon juice for a bright, refreshing twist.
This dish isn't just about taste; it's about convenience and versatility. Whether you're feeding the family or hosting a casual get-together, the balance of savory sausage and crisp vegetables makes for a meal that's both hearty and wholesome. With just a few simple steps, you can whip up a dinner that's as satisfying as it is easy to prepare.
Leftovers can be stored in an airtight container in the refrigerator for up to 3-4 days. To reheat, gently warm the pasta in a skillet over medium heat with a splash of water or additional reserved pasta water to loosen the sauce. Alternatively, you can reheat it in the microwave, stirring occasionally to ensure even heating. If the pasta has absorbed too much sauce, a touch of olive oil or a bit more reserved pasta water can help bring it back to life.

Roasted beets, creamy goat cheese, and a hint of thyme come together in these delightful beet tarts, all atop a golden puff pastry crust. The magic lies in the harmonious balance of earthy beets, tangy cheese, and the satisfying crunch of toasted walnuts. A final drizzle of balsamic syrup elevates this dish to gourmet status, making it a show-stopping appetizer or a light meal when paired with a fresh salad.
Perfect for dinner parties or simply treating yourself to something special, these beet tarts are easy to make but impressive in both presentation and taste. The roasted beets offer a natural sweetness, contrasting beautifully with the creamy goat cheese and the crisp, flaky pastry. The toasted walnuts add a wonderful crunch, while the balsamic syrup provides a sweet and tangy finish that ties everything together.
These beet tarts are best enjoyed fresh out of the oven, but they can be stored and reheated with great results.
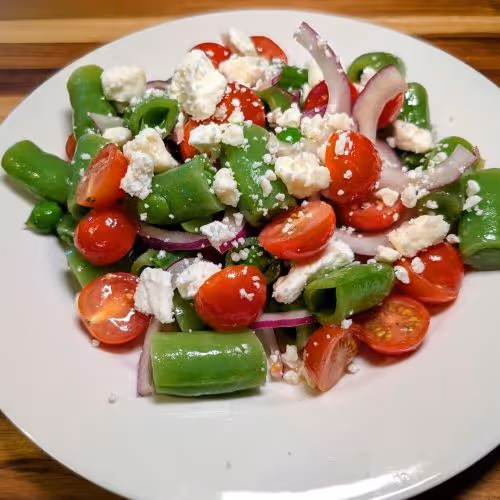
Sugar snap peas are a delightful addition to any summer dish, bringing a fresh crunch and a hint of sweetness that's hard to resist. This Sugar Snap Pea Salad with Lemon Vinaigrette is a perfect example of how simple ingredients can come together to create a delicious and satisfying meal. The crisp sugar snap peas, juicy cherry tomatoes, and tangy feta cheese are perfectly complemented by a zesty lemon vinaigrette, making this salad a must-try for any salad lover.
Not only is this salad incredibly tasty, but it's also a breeze to prepare. In just a few minutes, you can whip up a dish that's bursting with flavor and nutrition. Whether you're looking for a light lunch, a side dish for a summer barbecue, or a vibrant addition to your dinner table, this Sugar Snap Pea Salad is sure to impress.

Roasted Parmesan Snap Peas bring a delightful crunch and savory flavor to your table. These golden-brown snap peas, coated with panko, parmesan, and a hint of garlic, make for an irresistible treat that’s quick and easy to prepare.
No more boring vegetables; Roasted Parmesan Snap Peas are here to elevate your meal. The combination of crispy panko and rich Parmesan with the freshness of snap peas creates a side dish that’s not only delicious but also nutritious. It's the perfect way to add a touch of gourmet to your everyday meals.
These snap peas pair wonderfully with a variety of main dishes. Serve them alongside grilled chicken or fish for a light and healthy dinner. They also complement a hearty steak or a savory pork roast beautifully. For a vegetarian option, try them with a creamy risotto or a quinoa salad.
Store any leftovers in an airtight container in the refrigerator. They’ll stay fresh for up to three days. To reheat, spread the snap peas on a baking sheet and warm them in a preheated oven at 350°F for about 5-7 minutes, or until heated through. This will help maintain their delightful crunch.

Nothing beats a steaming bowl of soup, especially when it's brimming with fresh, healthy ingredients like bok choy, tofu, and udon noodles. This soup is a delightful blend of flavors and textures that come together in a harmonious medley of savory broth, tender noodles, and crisp vegetables. It's not just delicious—it's also incredibly easy to prepare, making it the perfect choice for a cozy weeknight dinner or a light lunch.
The gentle heat of ginger and garlic infuses the broth with warmth, while the miso paste adds a depth of umami that will have you savoring every spoonful. Tofu provides a satisfying protein boost, and bok choy contributes a subtle sweetness and crunch. This soup is a celebration of simple, wholesome ingredients that come together to create something truly special.
To store your leftover soup, let it cool to room temperature before transferring it to an airtight container. It can be kept in the refrigerator for up to 4 days. When you're ready to enjoy it again, reheat the soup on the stove over medium heat, stirring occasionally until it's warmed through. If the noodles have absorbed too much broth and the soup seems too thick, add a splash of vegetable broth or water to reach your desired consistency.
This soup freezes well, making it a great option for meal prep. To freeze, let the soup cool completely and then transfer it to freezer-safe containers or heavy-duty freezer bags. It can be stored in the freezer for up to 3 months.
When you're ready to eat the frozen soup, thaw it in the refrigerator overnight. Reheat on the stove over medium heat until it's thoroughly warmed. As with reheating leftovers, you may need to add a bit of broth or water to achieve the perfect consistency. Enjoy your homemade soup anytime you need a quick and delicious meal!

Summer is the season for fresh flavors, and there's no better way to celebrate than with a plate of Chicken Pad Thai. This dish is a delightful blend of tender chicken, crunchy cabbage, and sweet carrots, all tossed in a tangy tamarind and oyster sauce with just the right amount of heat from sambal oelek. It's a harmonious balance of sweet, salty, sour, and spicy that will tantalize your taste buds.
Finding ingredients like tamarind paste and sambal oelek is easier than you might think. Both can be found at your local Asian grocery store or in the international aisle of most supermarkets. Tamarind paste brings a unique sourness to the dish, while sambal oelek adds a kick of chili heat. Paired with the savory notes of fish and oyster sauce, these ingredients elevate this Pad Thai into something truly special.
Pad Thai makes excellent leftovers and is easy to store and reheat. Here’s how to keep it fresh and tasty:
For the Pad Thai:
For the Sauce:

Say hello to Spicy Miso Mazemen, your new favorite noodle dish! This Japanese-inspired meal offers the rich, savory flavors of ramen but without the broth, making it a perfect option for those who crave all the goodness of ramen but in a lighter form. Mazemen, a brothless ramen, focuses on the harmony between the noodles and the sauce (tare), creating a delightful and intense taste experience in every bite.
The star of this dish is the white miso-based sauce, which is perfectly balanced with chili crisp, soy sauce, and sesame oil. Pan-fried tofu adds a satisfying crunch, while fresh snap peas, carrots, and sauteed bok choy bring a refreshing contrast. To top it all off, a silky onsen egg crowns this bowl of perfection, adding a rich, creamy texture. Spicy Miso Mazemen is an ideal dish for a delicious and impressive meal.
For the Sauce:
Toppings:

Deviled eggs have long been a staple at gatherings, but what if they could be even more delightful? Enter beet pickled deviled eggs —a combination that transforms the classic appetizer into a showstopper. The beet-infused pickling process not only adds a stunning magenta hue but also imparts a subtle earthy sweetness to the eggs. Topped with a creamy yolk mixture and a hint of fresh dill, these deviled eggs are both visually and gastronomically appealing.
Perfect for any occasion, from casual picnics to elegant dinner parties, these deviled eggs are sure to impress. The unique color and flavor make them an exciting addition to any spread, sparking conversation and compliments. Whether you’re a seasoned cook or just looking for something new to try, these beet pickled deviled eggs will elevate your appetizer game.
If you have any deviled eggs left over, they can be stored in the refrigerator for up to two days. Place them in an airtight container to keep them fresh and to prevent them from absorbing any other odors from the fridge. For best results, store the egg halves and the yolk mixture separately, and assemble just before serving to maintain the texture and flavor. If the yolk mixture seems a bit dry after storing, simply stir in a small amount of mayonnaise to refresh it.
For Beet Pickled Eggs:
For Deviled Eggs:
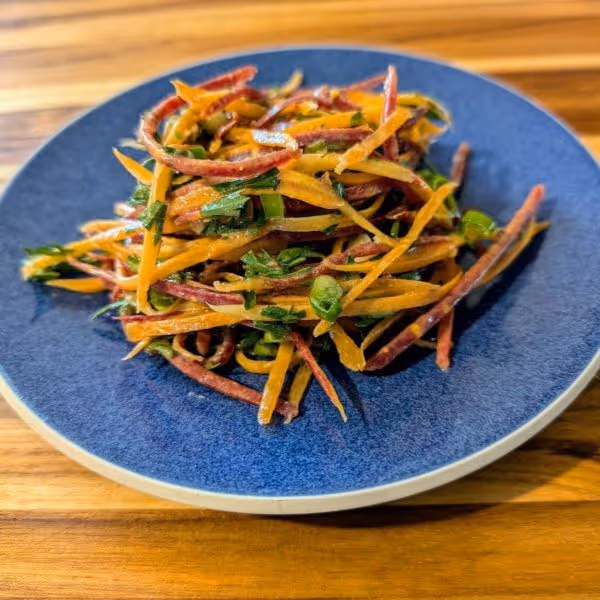
Carrot salads often get a bad rap for being boring or overly simple, but not this one. This dish combines the crisp, sweet crunch of julienned carrots with a tangy honey Dijon vinaigrette, infused with the fresh, herbal notes of carrot tops and green onion. It's a salad that’s as delightful to eat as it is to look at, making it a perfect addition to any table.
The beauty of this carrot salad lies in its simplicity and its ability to transform everyday ingredients into something extraordinary. The honey Dijon vinaigrette is the star, offering a perfect balance of sweet and tangy that complements the natural sweetness of the carrots. Plus, using the carrot tops ensures nothing goes to waste and adds a unique twist that will impress your family and friends.
This salad pairs beautifully with a variety of dishes. It's a fantastic accompaniment to grilled meats like chicken or steak, providing a refreshing contrast to the savory flavors. For a lighter meal, serve it alongside a piece of grilled fish or a hearty grain bowl.
If you're planning a vegetarian feast, this salad complements dishes like roasted vegetable quiches or stuffed bell peppers. It’s also great for picnics and potlucks, where its vibrant colors and fresh taste will stand out on any buffet table.
In the unlikely event that you have any leftovers, storing them is a breeze. Transfer the salad to an airtight container and keep it in the refrigerator. It will stay fresh for up to two days. The vinaigrette might make the carrots a bit softer as they marinate, but they will still be delicious.
For the best texture, store the vinaigrette separately and toss it with the carrots just before serving if you know you'll have leftovers. This way, you maintain that delightful crunch with every bite.

Tired of the same old snacks and looking to elevate your appetizer game? This creamy green onion dip is the answer. Packed with fresh green onions, tangy sour cream, zesty lemon juice, and a hint of garlic, it’s a refreshing twist on the classic sour cream and onion dip. Ideal for using up that bounty of green onions from your CSA box, this dip brings a burst of flavor that will make any veggie platter or chip bowl the star of the show.
Quick to prepare and irresistibly delicious, it’s sure to become a go-to in your recipe repertoire. It's perfect for all of your summer time social gatherings. Enjoy the fresh, zesty flavors and the ease of preparation, and don’t hesitate to experiment with the variations to make it truly yours.
Customizing This Dip
How to Store Leftovers
Storing this creamy dip is a breeze. Simply transfer it to an airtight container and refrigerate. It will stay fresh and flavorful for up to 5 days. When it’s time to enjoy the leftovers, give the dip a good stir to reincorporate any separated liquid.
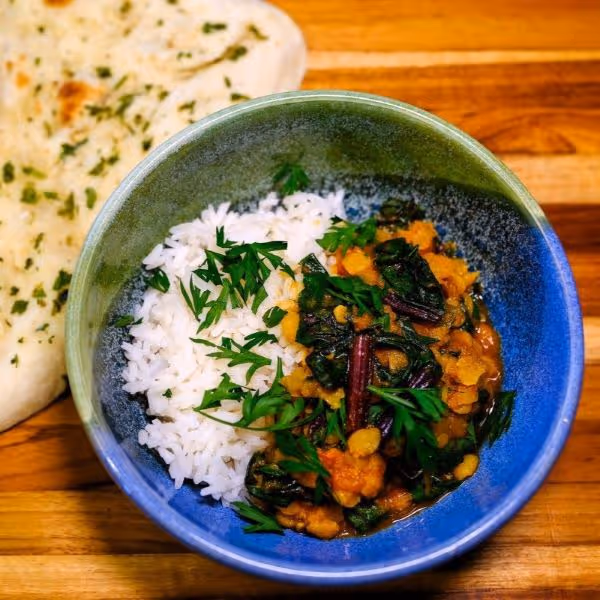
Masoor Dahl with Beet Greens is a delightful curry that brings together the earthy goodness of lentils and the vibrant freshness of beet greens. This dish is not only packed with flavor but also rich in nutrients, making it a wholesome option for any meal. The spices meld beautifully, creating a comforting, aromatic experience that’s both satisfying and nourishing.
This recipe is a wonderful way to utilize beet greens, often overlooked but incredibly nutritious. The tender red lentils simmered to perfection, combined with the slightly bitter greens, offer a delightful contrast in both taste and texture. Each spoonful is a testament to the simplicity and depth of Indian cuisine, perfect for a cozy dinner or a hearty lunch.
Leftover Masoor Dahl with Beet Greens can be a lifesaver on busy days. Store any leftovers in an airtight container in the refrigerator, where it will keep well for up to 3 days. When ready to eat, reheat gently on the stovetop over medium heat, stirring occasionally until heated through. If the dahl has thickened too much, add a splash of water or vegetable broth to achieve the desired consistency.
For longer storage, this dahl freezes beautifully. Let the dish cool completely before transferring it to freezer-safe containers or heavy-duty freezer bags. Label with the date and freeze for up to 3 months. When you’re ready to enjoy, thaw the dahl in the refrigerator overnight.
To reheat, place the thawed dahl in a saucepan over medium heat, stirring occasionally. Add a bit of water or broth to loosen the consistency if needed. Alternatively, reheat in the microwave on medium power, stirring every minute until evenly heated.
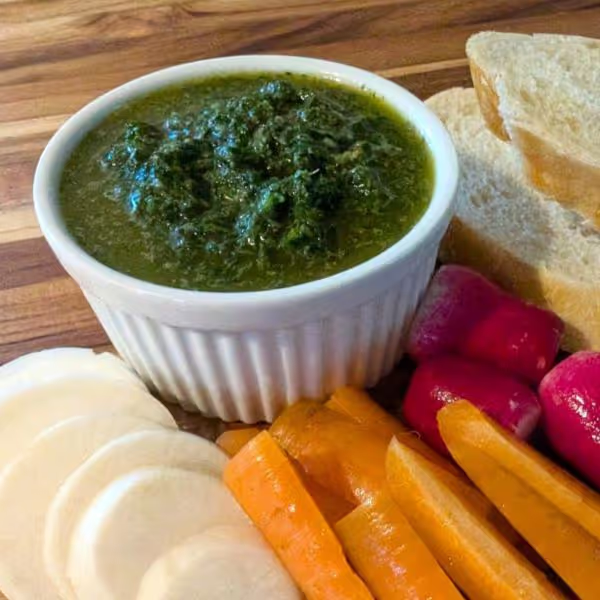
Carrot greens – often overlooked, but packed with flavor. This Italian salsa verde is a game-changer, transforming humble carrot tops into a tangy, herbaceous delight. Unlike its Mexican counterpart, which boasts tomatillos and chilies, Italian salsa verde is an herb-focused sauce, enriched with capers, garlic, and lemon. Perfect for pasta, grilled veggies, or a sandwich spread, this sauce is as versatile as it is delicious.
Italian salsa verde is all about the vibrant green herbs. Typically made with parsley, this version swaps in carrot greens, offering a wonderful way to use up those leafy tops that usually get tossed. Not only does this add a unique twist, but it also reduces waste – a win for both your palate and the planet. Whether you’re a seasoned cook or a kitchen novice, this recipe is easy to whip up and guaranteed to impress.
Storing your homemade salsa verde is a breeze. Simply transfer the sauce into a clean, airtight jar or container and keep it in the refrigerator. It will stay fresh for up to a week.
For longer storage, freezing is an excellent option. Pour the salsa verde into an ice cube tray and freeze until solid. Once frozen, transfer the cubes to a freezer-safe bag or container. This method allows you to defrost just the amount you need.
To thaw, place the desired number of salsa verde cubes in a bowl in the refrigerator overnight. Alternatively, you can defrost them in a microwave-safe bowl using the defrost setting or in a saucepan over low heat. Avoid high heat to maintain the vibrant color and fresh taste.

Weeknight dinners just got a whole lot easier and more delicious. Imagine coming home after a long day and knowing that with just a handful of ingredients and minimal effort, you can whip up a hearty, wholesome meal that leaves everyone at the table satisfied. This sheet pan recipe with sausage, potatoes, and garlic scapes is a culinary game-changer. The combination of savory sausages, crispy roasted potatoes, and slightly charred garlic scapes delivers a burst of flavors that are sure to become a family favorite.
The beauty of this dish lies in its simplicity. A quick toss of potatoes in olive oil and herbs, a squeeze of lemon juice on the garlic scapes, and a little time in the oven is all it takes. The sausages sit atop the vegetables, soaking up all the deliciousness and cooking to perfection. It's a one-pan meal that makes cleanup a breeze, leaving you more time to relax and enjoy your evening.
If you have any leftovers (which is rare because it’s so delicious!), storing and reheating is simple. Place the cooled sausages, potatoes, and garlic scapes in an airtight container and refrigerate for up to 3 days.
When you're ready to enjoy your leftovers, you have a couple of options for reheating:

Imagine a bite-sized delight that marries the earthy sweetness of roasted beets with the creamy richness of crème fraîche, all topped with the bright, herbaceous kick of fresh dill. These Roasted Beet and Dill Crostini are not just appetizers; they're an experience waiting to happen on your taste buds. Ideal for entertaining or as a luxurious snack, each element in this recipe harmonizes effortlessly to deliver layers of flavor and texture. Perfectly balanced between creamy, sweet, and herbaceous, they're a delightful addition to any culinary repertoire.

Welcome to the world of flavors where we bring you a recipe that’s not just a treat to your palate but also a joy to cook - the classic Potato Pakoras. These golden, crispy fritters are a staple in Indian cuisine and are perfect for any occasion, be it a cozy family gathering or a vibrant party with friends. Made with potatoes and aromatic spices, wrapped in a light chickpea flour batter, these pakoras are fried to perfection, offering a crunchy exterior with a soft, flavorful interior. So, let’s embark on this culinary journey and add a dash of spice to your kitchen with our easy-to-follow recipe.
To store leftover pakoras, let them cool completely and then place them in an airtight container. They can be kept in the refrigerator for up to 3 days. When you’re ready to enjoy them again, reheat the pakoras in a preheated oven at 350°F for about 5-10 minutes, or until they’re hot and crispy. You can also reheat them in an air fryer or on a skillet with a little oil to restore their crunch. Avoid using a microwave, as it can make the pakoras soggy.

There’s something incredibly satisfying about a chutney that packs a punch of fresh, bold flavors. Enter the Scallion Cilantro Chutney—a simple yet tantalizing condiment that promises to elevate your culinary experience. This chutney is a vibrant blend of cilantro, green onions, and a hint of heat from jalapeno, perfectly balanced with the tanginess of lemon juice. Whether you're a seasoned cook or a novice in the kitchen, this recipe is a breeze to whip up and will quickly become a staple in your home.
This chutney is not just about flavor; it's about versatility. The ingredients come together in a harmony that complements a variety of dishes, making it a must-have in your culinary repertoire. Plus, with a quick prep and cook time, you can easily incorporate this chutney into your meals without any fuss. It's fresh, it's green, and it's absolutely delicious—what more could you ask for?
If you find yourself with leftover chutney, storing it properly will ensure it retains its vibrant flavor and freshness. Transfer the chutney to an airtight container and pop it in the refrigerator. It will keep well for up to a week, maintaining its zing and zest. For an extended shelf life, consider freezing it in ice cube trays. Once frozen, transfer the cubes to a zip-lock bag and store in the freezer. This way, you can thaw just the amount you need, whenever you need it.
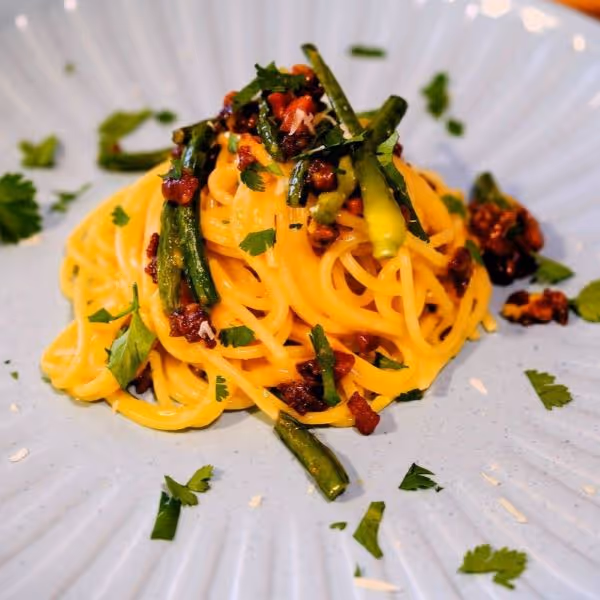
Spaghetti Carbonara is the ultimate comfort food, a creamy and savory dish that's steeped in Italian tradition. But what if we told you it could get even better? By adding garlic scapes, we've given this classic a delightful twist that enhances its rich flavors with a subtle garlicky punch. Featuring guanciale, a cured pork cheek that's a staple in authentic Carbonara, this recipe promises a meal that's both luxurious and irresistibly delicious.
Guanciale, the star of this dish, can be a little tricky to find, but it's well worth the hunt. In the Portland, OR metro area, you're in luck—head to specialty stores like Providore Fine Foods, Laurelhurst Market, or check out the local meat markets or farmer's markets for locally sourced guanciale. Trust us, this flavorful cut of meat adds a depth and richness that's unmatched, making every bite of your Carbonara an experience to savor.
Spaghetti Carbonara is best enjoyed fresh, but if you find yourself with leftovers, they can still be delicious the next day. Transfer any leftovers to an airtight container and store in the refrigerator for up to 2 days.
When you're ready to reheat, avoid the microwave, which can turn the pasta rubbery and make the sauce separate. Instead, reheat your Carbonara gently on the stove. Place the pasta in a skillet over low heat, adding a splash of chicken broth, milk, or reserved pasta water to help revive the sauce's creamy texture. Stir continuously until heated through, being careful not to scramble the eggs in the sauce. With these tips, you'll have a meal that's almost as good as when it was first made.
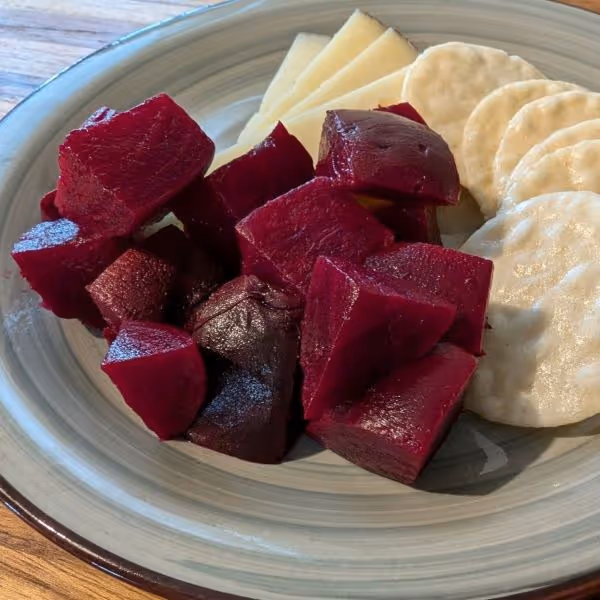
Looking to elevate your beet game? Our Spiced Pickled Beets are here to take you on a flavor journey. Roasting the beets before pickling not only softens them to perfection but also brings out a deeper, caramelized sweetness that infuses beautifully with apple cider vinegar, cloves, coriander, and cinnamon. The result is a vibrant, tangy, and subtly spiced beet that’s both delicious and versatile.
Say goodbye to bland, boiled beets and hello to a jar of goodness that will brighten up any dish. These pickled beets are not only easy to make but also store well in the refrigerator, making them a convenient addition to your culinary arsenal. Whether you're adding them to a salad or topping off a burger, this recipe is bound to become a favorite.

Salads can be so much more than a side dish, and this Spiced Pickled Beet and Goat Cheese Salad proves it. Combining the earthy sweetness of roasted pickled beets with the tangy creaminess of goat cheese, the crunch of toasted pecans, and a touch of red onion, this salad is a divine blend of flavors and textures. The honey balsamic vinaigrette ties it all together with a delightful balance of sweet and tangy.
The vibrant colors and fresh ingredients of this salad make it a feast for the eyes as well as the palate. Perfect for a light lunch, a side for dinner, or a standout dish at your next gathering, this salad is versatile and delicious.
To keep your salad fresh, store the components separately. Keep the spring salad greens, beets, goat cheese, and toasted pecans in individual airtight containers in the refrigerator. The honey balsamic vinaigrette should be stored in a small jar or container with a tight-fitting lid.
When you're ready to enjoy the salad again, simply assemble the desired amount, drizzle with the vinaigrette, and toss gently to combine. This way, your greens stay crisp and your nuts retain their crunch. Leftover salad components should be used within 3-4 days for the best quality.
Honey Balsamic Vinaigrette:

Get ready to tantalize your taste buds with a culinary adventure that blends savory, tangy, and fresh flavors into one incredible sandwich. The Lemongrass Chicken Banh Mi is a Vietnamese classic that brings together juicy, marinated chicken, crisp pickled vegetables, and a symphony of herbs, all nestled in a crusty baguette. Whether you're a seasoned chef or just exploring new recipes, this dish is sure to become a staple in your kitchen repertoire.
This recipe starts with tender chicken marinated in fragrant lemongrass, garlic, and fish sauce, creating a deliciously aromatic base. But what truly sets this Banh Mi apart is the homemade pickled vegetable mix—carrots, daikon radish, and cucumber—adding a zesty crunch that perfectly complements the savory chicken. Topped with fresh cilantro, spicy jalapeños, and a smear of creamy mayonnaise, each bite is an explosion of flavor and texture.
To enjoy your Lemongrass Chicken Banh Mi the next day, keep the components separate to maintain their texture and freshness. Store the marinated chicken in an airtight container in the refrigerator for up to three days. The pickled vegetables can be kept in their brine in the fridge for up to a week, allowing the flavors to deepen even further.
When you're ready for round two, reheat the chicken in a skillet over medium heat until warmed through. If using a microwave, heat in short bursts to avoid drying out the meat. Toast the baguette to restore its crispy exterior, then assemble your sandwich with the reheated chicken, pickled veggies, and fresh toppings. With proper storage and reheating, your Banh Mi will be just as delightful the second time around.
For the Chicken:
For the Pickles:
To Assemble:

Elevate your potato game with a delightful twist on the classic Peruvian dish, Papa a la Huancaína. Instead of the traditional cold boiled potatoes, this recipe features hot, crispy smashed purple potatoes paired with a luscious aji amarillo sauce. The crispy edges and soft centers of the potatoes perfectly complement the rich, tangy, and slightly spicy sauce. The striking colors and contrasting textures make every bite an adventure, promising to impress your family and friends.
Whether you're cooking for a special occasion or simply looking to try something new, these crispy smashed purple potatoes with aji amarillo sauce are sure to become a favorite.
Aji amarillo paste is a staple in Peruvian cuisine, made from the bright yellow aji amarillo pepper. This pepper has a unique fruity flavor with a moderate heat level, adding a distinctive depth to sauces and marinades. You can find aji amarillo paste at specialty Latin American grocery stores in town, such as Portland Mercado or El Campasino PDX. If you prefer shopping online, it's readily available on Amazon.
To store any leftover crispy smashed purple potatoes and sauce, follow these simple steps:
For the Potatoes
For the Aji Amarillo Sauce
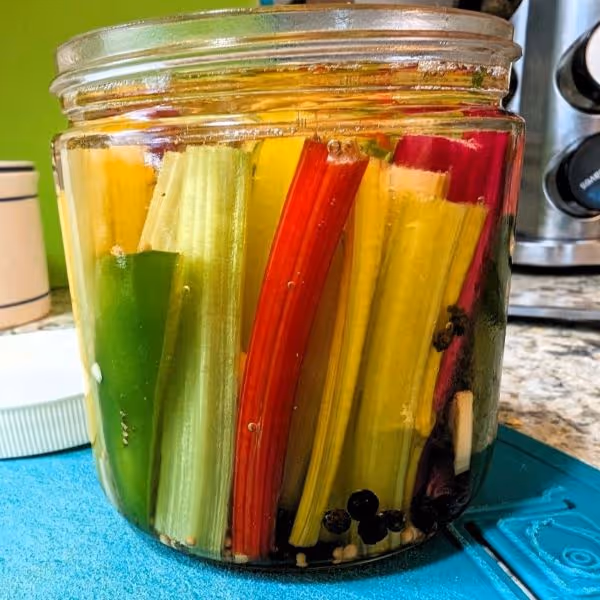
In the realm of cooking, there exists a treasure that is often overlooked, wasted even - chard stems. Have you ever considered the potential locked in those vibrant stalks, tossed aside in favor of their leafy counterparts? Well, it's time to shed some light on this underappreciated gem and introduce you to the world of pickled chard stems!
These stunningly colorful pickles are not just a feast for the eyes, they are a delight for the palate as well. Their delightful crunch and zesty tang make them a versatile addition to any meal. The best part? They're ridiculously easy to make. So, not only will you be reducing waste by using the entire chard, but you'll also have a delectable condiment at your disposal
Pickled chard stems are truly a testament to the wonders of culinary creativity. They challenge us to rethink our cooking habits, to see the potential in what we would usually discard, and reward us with a colorful, tasty, and versatile condiment.
Now, you might be wondering, "What do I do with these beautiful pickles?" That's the beauty of them - they're incredibly versatile. Spice up your charcuterie boards with the vibrant hues and unique flavors of pickled chard stems. They add a delightful crunch and tang that perfectly balances out the richness of the meats and cheeses.
But why stop there? Why not elevate your sandwich game by adding a few of these crunchy, tangy pickles? They can effortlessly transform a mundane sandwich into a gourmet delicacy. The possibilities are as limitless as your culinary imagination!
Preserved in a brine, these pickled chard stems can last for about two weeks in the refrigerator. The tangy flavor actually deepens over time, making them even more delicious! So, go ahead, make a big batch and enjoy the fruits (or should we say stems) of your labor for weeks to come!
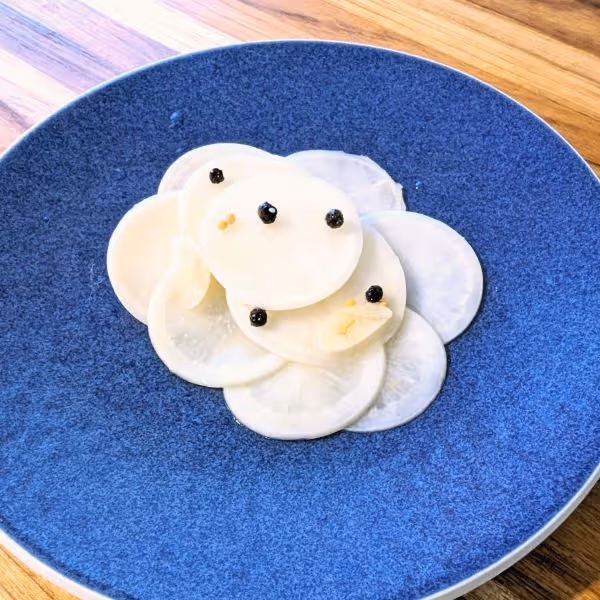
Hakurei turnips, those small, white, and crisp gems of the vegetable world, are the star of this pickling recipe that promises to transform your culinary experience. When bathed in a sweet and tangy brine and accented with fresh ginger, garlic, and mustard seeds, these turnips evolve into something extraordinary. They are not just pickles; they are a celebration of flavors, marrying the crunch of turnips with a sweet, spicy, and tangy notes.
This recipe brings together simplicity and sophistication. The process is straightforward, yet the results are incredibly complex and gratifying. The brine’s sweetness perfectly complements the turnips' natural peppery taste, while the ginger and garlic add a warming zing and the mustard seeds a subtle pungency. These pickles are versatile, and whether you’re a seasoned chef or a kitchen novice, they are a delightful project that yields delicious rewards.

Looking for a breakfast dish that’s as vibrant and energizing as your morning coffee? This Chimichurri Breakfast Hash is a game-changer. It’s a one-pan wonder that combines crispy potatoes, bell peppers, sausage, and nutrient-packed kale, all crowned with perfectly cooked eggs and a drizzle of zesty chimichurri sauce. This hash is the perfect way to start your day with a punch of flavors that will keep you satisfied and fueled.
What makes this breakfast hash truly special is its versatility and the robust flavors that come together in every bite. The combination of crispy potatoes with the rich, smoky sausage and the freshness of kale creates a balance that’s both hearty and wholesome. The crowning glory is the chimichurri sauce, adding a bright and tangy finish that elevates the entire dish. Whether you're making brunch for friends or enjoying a quiet morning at home, this breakfast hash is a surefire hit.
For the Hash:
For the Chimichurri:

Turnips often fly under the radar in the world of vegetables, but Hakurei turnips deserve a moment in the spotlight. These small, white globes are tender and slightly sweet, making them perfect candidates for a delectable soy ginger glaze. When roasted, they develop a caramelized exterior that pairs beautifully with the savory, tangy sauce. This recipe isn't just about making a side dish; it's about transforming an overlooked vegetable into a star on your dinner table.
Hakurei turnips have a delightful texture that absorbs flavors beautifully while maintaining a bit of crunch. The soy ginger glaze adds an umami punch, balancing sweetness and acidity with a touch of sweet. It's a dish that’s simple to prepare yet impressive enough for company. Ready to give those turnips a gourmet twist? Let’s get started!
Leftovers are a rare occurrence with a dish this tasty, but if you do find yourself with extra, here’s how to keep them at their best. Store the glazed turnips in an airtight container in the refrigerator for up to three days. When you're ready to enjoy them again, preheat your oven to 350°F. Spread the turnips out on a baking sheet and cover them loosely with foil. Heat for about 10-15 minutes until warmed through. For a quicker option, you can also reheat them in a microwave-safe dish in the microwave for 1-2 minutes, stirring halfway through to ensure even heating.

Looking for a hearty and delicious dinner that's as easy to make as it is satisfying? This skillet dinner with linguica sausage, chard, white beans, and potatoes checks all the boxes. Bursting with robust flavors and packed with nutritious ingredients, it's a one-pan wonder that will quickly become a staple in your dinner rotation. Plus, it’s ready in just 45 minutes from start to finish, making it perfect for busy weeknights.
This dish brings together the smoky, savory notes of linguica sausage with the earthiness of chard and the creamy texture of white beans. Add in perfectly cooked potatoes and a touch of lemon juice, and you have a meal that's both comforting and vibrant. Whether you're cooking for family or friends, this recipe delivers big, bold flavors with minimal effort.
Have leftovers? Lucky you! To store, transfer the cooled leftovers to an airtight container and refrigerate. They’ll keep well for up to 3 days. When you're ready to enjoy them again, simply reheat in a skillet over medium heat, adding a splash of chicken broth or water if needed to prevent sticking. Alternatively, you can microwave the leftovers in a microwave-safe dish until warmed through.
To freeze, let the dish cool completely, then transfer it to a freezer-safe container or heavy-duty freezer bags. Label with the date and freeze for up to 3 months. When you're ready to eat, thaw the meal in the refrigerator overnight. Reheat in a skillet over medium heat, adding a little broth or water to bring back the original texture and flavors.

If you’ve never had a Spanish tortilla before, you’re in for a treat. A Spanish tortilla is a thick and savory egg dish that’s similar to a frittata, but with more potatoes and less eggs. It’s a staple in Spain, where it’s often served as a tapa or a main course with bread and salad. In this recipe, I’ve added some extra flavor and texture with roasted red peppers, chorizo, and Manchego cheese. The result is a scrumptious and filling tortilla that’s perfect for any occasion.
This tortilla can be enjoyed at any time of the day, from breakfast to dinner. You can serve it with some crusty bread and a green salad as a complete meal, or you can cut the tortilla into bite sized pieces as part of a tapas spread. You can also make it ahead and store it in the fridge or freezer for later. A Spanish tortilla is a delicious and satisfying dish that you will love.
To store the leftovers, wrap the tortilla in aluminum foil or plastic wrap and refrigerate for up to 4 days. You can also cut the tortilla into individual slices and store them in an airtight container or a ziplock bag.
To reheat the leftovers, you can either microwave them for a few seconds, or heat them in a skillet over low-medium heat, flipping once, until warm and crisp. You can also reheat the tortilla in the oven at 350°F for 10 to 15 minutes, or until heated through.
To freeze the tortilla, let it cool completely and then wrap it tightly in aluminum foil or plastic wrap. You can also cut the tortilla into individual slices and wrap them separately. Then, place the wrapped tortilla or slices in a freezer-safe container or a ziplock bag and freeze for up to 3 months.
To reheat the tortilla after being frozen, you can either thaw it in the refrigerator overnight, or microwave it for a few minutes, or until defrosted. Then, follow the same instructions as above for reheating the leftovers.

There's something magical about the bounty of summer vegetables. Picture bell peppers, zucchini, yellow squash, and cherry tomatoes, all roasted to perfection with olive oil, garlic, and herbs. When these vibrant veggies are paired with creamy parmesan polenta, it's like summer on a plate—a comforting, colorful dish that’s as pleasing to the eye as it is to the palate.
The combination of roasted vegetables and creamy polenta is a celebration of the season's freshest produce. Roasting the veggies brings out their natural sweetness and intensifies their flavors, creating a rich and satisfying dish. The creamy polenta, enriched with parmesan, serves as the perfect canvas for these roasted beauties, offering a delightful contrast in texture and flavor. This dish is not only delicious but also versatile, making it a fantastic addition to your summer recipe repertoire.
Whether you're feeding a family or just yourself, this recipe is a great way to make the most of your CSA haul. It's easy to prepare, incredibly tasty, and makes for a beautiful presentation on your dinner table. Let's dive into some ways you can make this dish your own and ensure that every bite is as delightful as the first.
Storing leftovers is a breeze and ensures you can enjoy this delicious dish again. For the roasted veggies, place them in an airtight container and refrigerate. They’ll stay fresh for up to 4 days. The polenta can also be stored in a separate airtight container in the fridge for the same duration.
When you're ready to reheat, here are some tips:

Have you ever tasted the unique, subtly spicy flavor of French Breakfast radishes? These little gems, sautéed to perfection in butter and sprinkled with fresh chives, create a mouthwatering side dish that’s as elegant as it is easy to prepare. Their mild heat, softened by the cooking process, pairs wonderfully with the richness of butter, while the fresh chives add a pop of color and a hint of oniony brightness.
This dish brings a touch of sophistication to your morning meal without demanding much time or effort. Whether you’re serving them alongside eggs and toast or as a light, savory snack, these radishes are sure to impress. So, grab your skillet and let’s transform these humble radishes into a breakfast sensation that will have everyone asking for seconds.
While the classic combination of butter, chives, and salt is undeniably delicious, there’s plenty of room to experiment:
If you find yourself with leftovers (though it’s hard to imagine anyone resisting a second helping), storing and reheating them is a breeze:
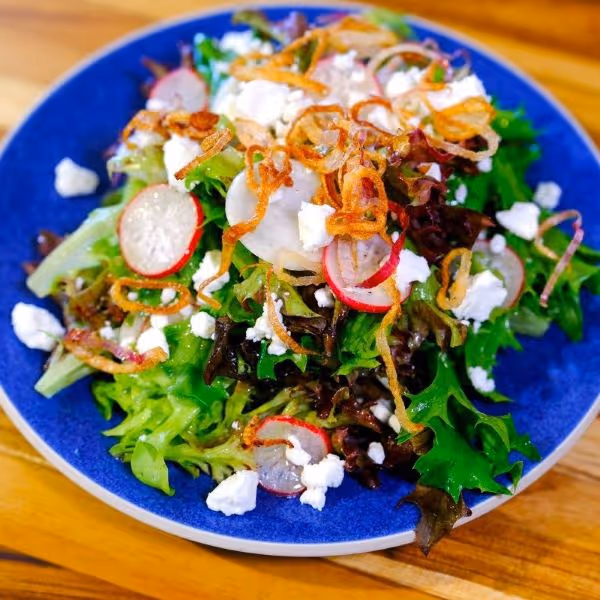
Springtime means an abundance of fresh, colorful vegetables, especially if you're part of a CSA program. One of the stars of the spring harvest is the Hakurei turnip—crisp, sweet, and perfect for salads. Paired with crunchy radishes and a mix of tender spring greens, this salad is a refreshing and satisfying dish that highlights the best of the season.
What makes this salad truly special are the crispy fried shallots and creamy goat cheese, which add layers of texture and flavor. The shallots bring a delightful crunch and savory depth, while the goat cheese offers a tangy creaminess that balances the sharpness of the radishes and the zest of the lemony chive dressing. Whether you're enjoying it as a light lunch or a side dish, this salad is a delicious way to embrace the fresh flavors of spring.
If you have leftovers, store the salad components separately to keep everything fresh:
When you're ready to enjoy the salad again, simply toss the greens and vegetables with the dressing, top with crispy shallots and goat cheese, and savor the fresh, vibrant flavors of spring all over again.

When a craving for something both comforting and nutritious strikes, pan-fried polenta with sautéed greens hits the spot. Picture golden, crispy-edged polenta cakes, topped with a tangle of vibrant greens, a squeeze of lemon to brighten things up, and a dollop of creamy goat cheese for that perfect tangy finish. This dish is a celebration of textures and flavors that will make you savor every bite.
What’s fantastic about this recipe is its versatility. Use any hearty greens you have on hand—whether it’s kale, chard, or even the often-overlooked greens attached to your turnips, beets, or radishes. This adaptability not only helps reduce food waste but also lets you tailor the dish to your personal taste or whatever's fresh in your CSA box hat week. Whether served as a satisfying main course or a stunning side dish, this polenta creation is sure to impress.
Feel free to get creative with this dish! Here are some ideas to make it your own:
Leftovers? No problem! This dish stores beautifully, making it a great candidate for meal prep.
For the Polenta:
For the Sautéed Greens:

Meet your new go-to salad: Napa Cabbage Caesar Salad with Grilled Chicken. This isn't your average Caesar salad; it's a refreshing twist that packs a flavorful punch while staying delightfully crisp. Napa cabbage replaces the traditional romaine, bringing a tender crunch that lasts, making this salad a perfect candidate for meal prep. Say goodbye to soggy lettuce and hello to a salad that stays vibrant and delicious from the moment you make it to the moment you dig in at work or school.
The grilled chicken adds a smoky, savory layer that elevates this salad to a satisfying meal. Combined with the tangy, creamy Caesar dressing, crunchy croutons, and a sprinkle of Parmesan, each bite is a harmonious blend of flavors and textures. Whether you're looking for a hearty lunch or a light dinner, this salad has got you covered.
Got leftovers? This salad stores beautifully. Keep the salad and dressing separate in airtight containers. The Napa cabbage's sturdy leaves won’t wilt quickly, so you can mix the salad and dressing up to a day in advance without losing that perfect crunch. Grilled chicken can be stored for up to three days in the refrigerator. For best results, keep it in a separate container and combine with the salad just before serving to maintain its juicy texture.
For The Chicken:
For the Caesar Dressing:

Summer is almost here, and that means it's time to enjoy the bounty of fresh fruits and vegetables from your CSA membership. One of my favorite ways to use up all the summer produce is to make a big pot of minestrone soup. Minestrone is a classic Italian soup that can be adapted to whatever ingredients you have on hand. It's hearty, filling, and comforting, but also light and refreshing.
This summer minestrone soup is especially delicious because it features a homemade garlic scape pesto that adds a ton of flavor and brightness to the dish. Garlic scapes are the curly green stems that grow from the garlic bulb. They have a mild garlic flavor and a crunchy texture. To make the pesto, you just need to blend the scapes with some pine nuts, lemon, cheese, and olive oil. It's so easy and so tasty!
The soup itself is made with vegetable stock, diced tomatoes, summer squash, green beans, cannellini beans, chard, and small pasta. It's a simple and satisfying combination that showcases the best of summer. You can serve the soup hot or cold, and add a dollop of garlic scape pesto on top of each bowl. Sprinkle some grated parmesan cheese if you like, and enjoy!
You can store the leftover soup and pesto separately in airtight containers in the refrigerator for up to 4 days. To reheat the soup, you can microwave it in a microwave-safe bowl for 2-3 minutes, stirring halfway, or heat it in a pot over medium-low heat, stirring occasionally, until hot.
You can freeze the soup and pesto separately in freezer-safe containers for up to 3 months. To thaw the soup and the pesto, you can transfer them to the refrigerator overnight, or microwave it on low power, stirring occasionally, until defrosted. You can also reheat the soup and pesto directly from frozen, following the same methods as above, but allowing more time and stirring more frequently.
For the garlic scape pesto:

Pizza - a simple word that immediately brings a smile to our faces. But what if I told you that we're about to take this universal favorite to a whole new level? Hold your breath as we introduce our star of the day - the Bacon Kale Pizza with an incredibly luscious roasted garlic white sauce. This isn't just another pizza recipe, it's a piece of art, an experience you wouldn't want to miss.
The crispy bacon lends a fantastic crunch and a smoky flavor that contrasts perfectly with the earthy freshness of kale. And the white sauce? Well, it's the game-changer here. The roasted garlic infuses the sauce with a rich, aromatic flavor that ties the whole pizza together. It's a symphony of flavors and textures that you won't easily forget.
The best way to store leftover pizza is to wrap it tightly in aluminum foil or place it in an airtight container before refrigerating. When you're ready to dive back into the pizza goodness, reheat it in an oven preheated to 350°F. Heat for about 10 minutes or until the cheese is bubbly and the crust is crispy. Avoid using a microwave to reheat as it can make the crust soggy.
For the Sauce:
For the Pizza:

There's something about coffee cake that makes it so comforting and satisfying. Maybe it's the soft and fluffy texture, or the sweet and spicy flavor, or the fact that you can enjoy it with a cup of coffee or tea. Whatever it is, coffee cake is a classic treat that never goes out of style. And this pear butter coffee cake is a wonderful variation that adds a touch of autumn to the traditional recipe. This cake is sure to impress your family and friends with its delicious taste and beautiful appearance.
Let the cake cool completely before cutting into pieces and storing in an airtight container or a ziplock bag. You can keep the cake at room temperature for up to 3 days, or in the refrigerator for up to a week.
To reheat, you can microwave a piece of cake for 10 to 15 seconds, or bake it in a 350°F oven for 5 to 10 minutes, until warm.
Wrap the cake tightly in plastic wrap and then in aluminum foil or place it in a freezer-safe container or a ziplock bag. You can freeze the cake for up to 3 months.
To reheat, you can thaw the cake in the refrigerator overnight, or at room temperature for a few hours, and then follow the same steps as above for reheating.
For the cake:
For the topping:

Have you ever tried tarte tatin? It's a traditional French pastry that consists of caramelized apples baked under a layer of puff pastry. The result is a stunning upside-down tart that is crispy, gooey, and melt-in-your-mouth good.
This recipe is a simplified version of the original, using store-bought puff pastry instead of homemade, and simplifying the caramel making process by using maple syrup instead of sugar. It also adds a touch of cinnamon for extra flavor and warmth.
You can serve this tarte tatin warm or at room temperature, with a scoop of vanilla ice cream or whipped cream if you like. It's a great way to end a meal or enjoy a cozy afternoon treat. Trust me, once you try this tarte tatin, you'll be hooked!
You can store the leftover tarte tatin in an airtight container in the refrigerator for up to 3 days. To reheat the tarte tatin, bake it in a preheated oven at 350°F for 10 to 15 minutes, until the pastry is crisp and the caramel is bubbly.

I’m sure most of you are familiar with cooking and eating zucchini and other summer squashes by now. But, have you ever tried squash blossoms? These delicate flowers are usually available in early summer and are well worth becoming acquainted with!
One of the most classic ways to prepare them is to stuff them with an herb and cheese mixture, then fry them in a light, airy batter until golden and crispy. They make a dazzling addition to any antipasto platter.
Squash blossoms are edible flowers that grow on squash plants. They have a mild squash flavor and a delicate texture. They’re typically available from mid to late summer.
Squash plants produce both male and female flowers. The male flowers have long, thin stems and no fruit attached to them. The female flowers have small bulbs or baby squash at the base of the petals. You can use either type for this recipe, though the male flowers tend to be easier to stuff. The male flowers also tend to come with a bit of the stem still attached, which when fried is reminiscent of a tempura green bean.
The blossoms should be used as soon as possible after picking, preferably the same day. If you need to store them, you can keep them in the refrigerator for up to a few days. The best way to store them is to lay them flat on a paper towel or a tissue on a dish or a flat container. You can also cover them with a slightly damp paper towel or put them in a mesh bag in the crisper drawer. The goal is to keep them moist but not wet, and allow some air circulation to prevent spoilage.
Storing and Reheating Leftovers
Honestly, these don’t make the best leftovers. The key to this dish is that crispy, airy batter, which tends to get soggy in the fridge. But, if you do find yourself with some leftovers, you can store them in the fridge for up to 2 days, then either reheat in the oven or pop them back in some hot oil for just a minute to recrisp them. Keep a close eye on them, though, as they can burn quickly. I wouldn’t recommend trying to microwave them as this will ensure they get soggy.
For the Filling:
For the Batter:
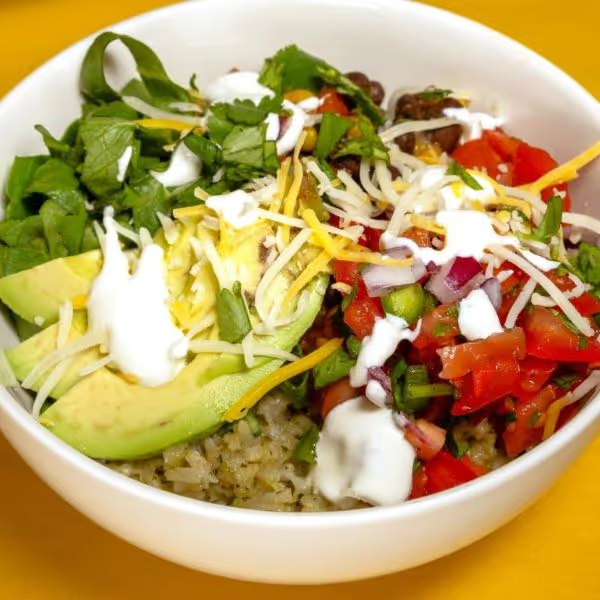
Do you ever get bored of the same old sandwiches or salads for lunch? Do you wish you could have something more exciting and satisfying, without spending a fortune on takeout or delivery? Well, I have the perfect solution for you: Spicy Black Bean Burrito Bowls! These are not your average burrito bowls. They are loaded with rice, spicy black beans, fresh vegetables, pico de gallo, cheese, and avocado. They are so flavorful and filling, you won’t even miss the meat. And the best part is, you can make them ahead of time and store them in the fridge for easy meal prep lunches.
These burrito bowls are also super easy to make, vegetarian, gluten-free, and high in protein and fiber. They are a great way to eat healthy and save money, as they are much cheaper and healthier than the fast food version. Plus, they are so delicious, you will look forward to lunch every day.
Here are some suggestions for how to substitute or customize the ingredients for these burrito bowls:
While the pico and avocado won’t hold up well in the freezer, you can definitely make big batches of the rice and bean mixture to freeze for later.
To freeze, divide the rice and the bean mixture into small freezer and microwave safe containers in individual portions. Label and date the container and freeze for up to 3 months. Then, all you have to do is defrost the containers in the fridge overnight and make your pico de gallo and prep the avocado to add on top!
For the pico de gallo:
For the bean mixture:
For assembling:

Roasted Poblano Rice is a celebration of bold flavors and simple ingredients. Picture plump poblano peppers, their skins charred to perfection, revealing a smoky depth that dances harmoniously with every bite. In this recipe, we elevate the humble rice grain by infusing it with the essence of roasted poblanos, fragrant garlic, and aromatic onions.
This Roasted Poblano Rice is a versatile side dish that pairs beautifully with grilled meats, tacos, or even a simple avocado salad. So, gather your ingredients, let the poblanos take center stage, and savor the magic of this delightful recipe!
Store any remaining Roasted Poblano Rice in an airtight container in the refrigerator. It’ll stay fresh for up to 3 days. To reheat, add a splash of water or broth to the rice to prevent it from drying out. Microwave or gently warm it on the stovetop, fluffing it with a fork as it warms.

Do you love roasted vegetables as much as I do? They are so flavorful, tender, and nutritious. They make any dish more delicious and satisfying. And they are super easy to make, too. Just toss them with some olive oil and seasonings, and pop them in the oven. Voila! You have a wonderful side dish, salad, or in this case, sandwich filling.
That's right, today I'm going to show you how to make a roasted vegetable sandwich with creamy herb spread. This sandwich is a vegetarian delight! It has roasted eggplant, zucchini, mushrooms, and bell peppers, which are spiced with smoked paprika, garlic, and thyme. It also has a refreshing yogurt-based herb spread, which is made with basil, parsley, garlic, and lemon juice. And of course, it has fresh mozzarella cheese and baby arugula leaves, which add some creaminess and crunch. The sandwich is served on crusty sandwich rolls, which are toasted to perfection. This sandwich is a feast for the eyes and the mouth!
You can customize this sandwich to suit your preferences and dietary needs. Here are some suggestions:
You can store the roasted vegetables and the herb spread separately in airtight containers in the refrigerator for up to 3 days. To reheat the roasted vegetables, you can microwave them for a few minutes, or bake them in the oven at 375°F for 10 to 15 minutes, until warmed through. Then, assemble the sandwich according to the recipe.
For the roasted vegetables:
For the creamy herb spread:
To assemble:

There's something about soup that just makes me happy. Maybe it's the way it fills the house with a mouthwatering aroma, or the way it soothes the soul with every spoonful. Whatever it is, I can't get enough of it, especially when it's caldo verde.
Caldo verde is a traditional Portuguese soup that has been around for centuries. It's one of those recipes that has been passed down from generation to generation, and each family has their own version of it. The basic ingredients are potatoes, kale, and chorizo, but you can also add other vegetables, herbs, or spices to suit your taste.
The beauty of caldo verde is that it's simple, yet satisfying. You don't need a lot of fancy equipment or ingredients to make it, just a pot and a blender or potato masher. The soup is thick and creamy, thanks to the pureed potatoes, and the kale adds a nice touch of green and texture. The chorizo is the star of the show, though, adding a smoky and spicy kick that elevates the whole dish.
If you have any leftovers of caldo verde, you can store them in an airtight container in the refrigerator for up to 4 days. To reheat them, you can either microwave them in a bowl or heat them in a pot over medium-low heat, stirring occasionally, until hot.
If you want to freeze caldo verde, you can do so in a freezer-safe container or a ziplock bag for up to 3 months. To reheat it, you can either thaw it in the refrigerator overnight or microwave it on the defrost setting until soft. Then, you can either microwave it in a bowl or heat it in a pot over medium-low heat, stirring occasionally, until hot.

Budino di ricotta may sound fancy, but it’s actually a simple and delicious dessert that anyone can make. It literally means “ricotta pudding”, but don’t let the name fool you. This is not your average pudding. It’s more like a light and creamy cheesecake, made with fresh ricotta cheese, almond flour, sugar, eggs, and lemon zest. And to make it even more irresistible, it’s topped with a homemade blueberry sauce that adds a pop of color and flavor. This is a dessert that will make you feel like you’re in Italy, even if you’re just in your kitchen.
The ingredients for this are easy to find, and you probably have most of them in your pantry already. The only thing you need to splurge on is good-quality ricotta cheese, as it is the star of the show. Trust me, it makes a huge difference in the flavor and texture of the budino. You want a full-fat ricotta that is fresh, sweet, and firm, not watery or sour.
If you have any leftovers of this delicious dessert, you can store them in the refrigerator for up to 3 days. Make sure to cover the budino with plastic wrap or foil, and keep the sauce in a separate airtight container. You can enjoy the budino cold, or let it come to room temperature before serving. You can also reheat the sauce in the microwave or on the stove top, if you like it warm. Do not freeze the budino, as it will lose its texture and flavor.
For the Budino di Ricotta
For the Sauce
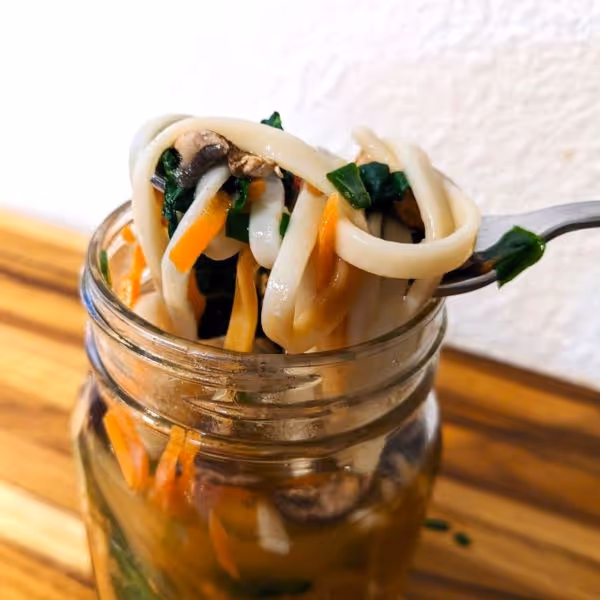
I love ramen, but I don’t love the sodium, preservatives, and additives that come with instant ramen packets, not to mention the total lack of vegetables. That’s why I decided to make my own spicy miso ramen jars that I can meal prep ahead of time and take with me wherever I go.
These jars are perfect for busy days when I need a fast and filling lunch. They have pre-cooked ramen noodles, sliced shitake mushrooms, grated carrot, chopped bok choy, and green onions. The broth is made with miso, soy sauce, chili garlic paste, and ginger paste. It’s spicy, savory, and umami-rich. All I have to do is add boiling water to the jar, stir well, and let it sit for a few minutes. Then I can enjoy a hot and hearty meal that will warm me up and fill me up.

Imagine biting into a taco that is crispy, cheesy, and juicy all at once. A taco that is filled with tender beef that has been slow-cooked in a rich and spicy broth, and topped with melted cheese that oozes out with every bite. A taco that you can dip in the leftover broth for extra flavor and satisfaction. That, my friends, is a quesabirria taco. And it’s one of the most delicious things you’ll ever taste.
To complete this delicious meal, you need a side dish that can complement the quesabirria without overpowering it. That’s where escabeche comes in. Escabeche is a simple and versatile pickled vegetable salad that can be made with whatever you have on hand. In this recipe, we use radishes, carrots, onion, and jalapeno, but you can also add cauliflower, cucumber, or any other crunchy veggie. The vinegar and spices add a bright and zesty flavor that helps mellow the richness of the quesabirria.
This recipe makes a pretty big batch of birria, so you may find yourself with more leftovers that you can eat. Luckily, the birria is very freezer friendly!
Freeze the beef and the broth in a freezer-safe container or ziplock bag, with as little air as possible, for up to 3 months. Thaw them in the refrigerator overnight, or in a bowl of cold water for a few hours, before reheating.
For the Birria:
For the escabeche:
To Assemble:

Nothing comes together quite as quickly, or is as versatile, as a stir fry. As long as you have a solid sauce, you can throw practically anything in there! One of our favorite classic combos though is beef with crispy snap peas.
Imagine thin slices of beef, marinated in a symphony of ginger, Shaoxing wine, and tamari. The snap peas, vibrant and green, join the party, twirling gracefully in the wok. And that sauce – sweet, savory, and a touch of umami – it’s the stuff food dreams are made of.
For the Stir-Fry:
For the Stir-Fry Sauce:

Crepes are thin and delicate pancakes that can be filled with anything you like. In this recipe, I show you how to make a creamy and sweet filling with ricotta cheese, honey, and lemon zest. Then, I top the crepes with a homemade blueberry sauce that is both sweet and tangy. The contrast of textures and flavors is amazing!
This recipe is perfect for any occasion, whether you want to surprise your loved ones with a special breakfast, or treat yourself to a delicious dessert. The best part is, you don’t need any fancy equipment or ingredients to make these crepes. All you need is a blender, a nonstick skillet, and some basic pantry staples. You can also customize the recipe to suit your preferences, by using different berries, sweeteners, or add-ins. I’ll show you how to do that in the post.
You can store the leftover crepes, ricotta, and coulis separately in airtight containers in the refrigerator for up to 3 days. To reheat the crepes, you can either microwave them for a few seconds or warm them in a skillet over low heat until soft and pliable. To reheat the coulis, you can either microwave it for a few seconds or simmer it in a small saucepan over low heat until warm and bubbly. Then, assemble the crepes as directed.
You can freeze the extra crepes by stacking them with parchment paper or wax paper in between and wrapping them tightly in plastic wrap or aluminum foil. Then, place them in a freezer bag and squeeze out as much air as possible. Label and date the bag and freeze for up to 3 months.
To reheat the frozen crepes, you can either thaw them in the refrigerator overnight or microwave them for a few seconds until soft and pliable. Then, proceed with the recipe as usual.